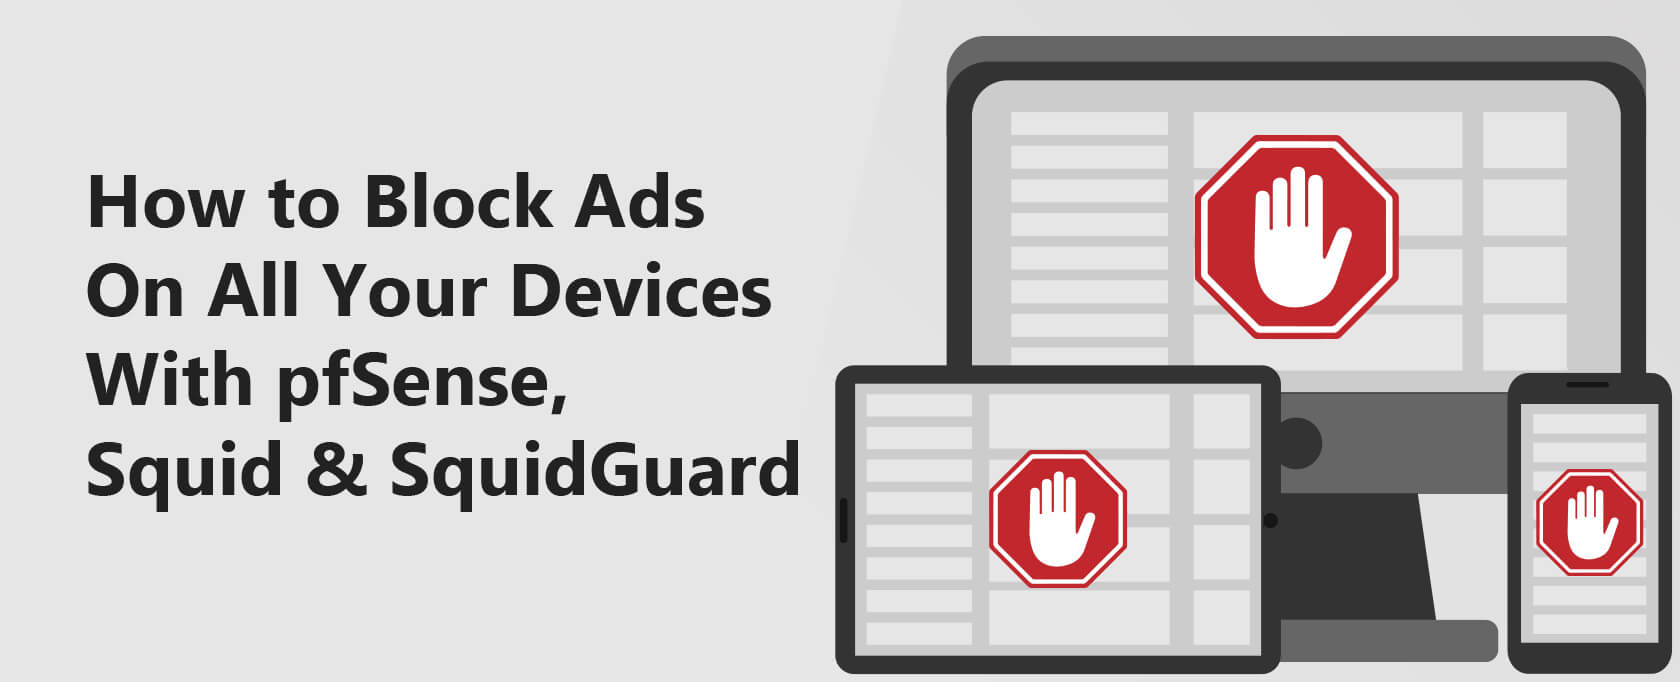
How to Block Ads On All Your Devices With pfSense, Squid & SquidGuard

pfSense is a powerful open-source router/firewall operating system based on FreeBSD. Out of the box, pfSense has some robust tools that allow you to build a secure network.
But pfSense also allows you to install packages from its official repository, to add even more functionality to your system.
- What is pfSense and how do you use it
- What is Squid and how do you use it
- How proxy servers work
- How to install and configure Squid
- How to install and configure SquidGuard
- How to block ads with pfSense, Squid & SquidGuard
pfSense is a powerful open-source router/firewall operating system based on FreeBSD. Out of the box, pfSense comes with some robust tools that allow you to build a secure network.
But pfSense also allows you to install packages from its official repository, to add even more functionality to your system.
One such package is called Squid. Squid is a caching web proxy that can also do content filtering. Let’s unpack that a little bit and provide some context around proxy servers and their use.
Related guide: How to Set Up IP Filtering and DNS Blackholing on pfSense Using pfBlockerNG
It introduces pfSense as a comprehensive open-source router/firewall solution known for its robust network defense capabilities. Squid is highlighted as a caching proxy that aids in content filtering.
The piece elaborates on the role of proxy servers in caching content and executing filtering functions. It provides a step-by-step guide for configuring Squid and SquidGuard on pfSense to block ads.
Using this method enhances security and privacy, reduces data consumption, and accelerates webpage loading times.
Proxy Servers
A proxy server is an intermediary server that sits between your device (laptop, tablet, smartphone) and your ultimate internet destination (whateverwebsite.com).
Your traffic leaves your device, connects to the proxy server, and then goes off to its ultimate destination from the proxy server.
Why send your traffic through the proxy server? There are a few reasons. One of them is to cache content. This means that the proxy server will save some content locally so that the next time a client requests that content, it will be served from the cache rather than going out to the internet to download it again.
This speeds up your internet browsing because fetching content from the proxy’s local cache is much faster than re-initiating a download over the internet.
Another purpose is content filtering. Content filtering means blocking connections to certain domains or IP addresses. Organizations that block access to Facebook, for example, are performing content filtering.
Another use for content filtering is to block ads. Online ads are obnoxious. They violate your privacy, consume your bandwidth, and are a major vector for malware. There are some excellent reasons to want to get rid of them. And that’s what we’re going to be using Squid in this article.
WWe’regoing to show you how to configure Squid and SquidGuard (SquidGuard is an extra component of Squid that enables list-based filtering) on pfSense to block ads on all of your devices.
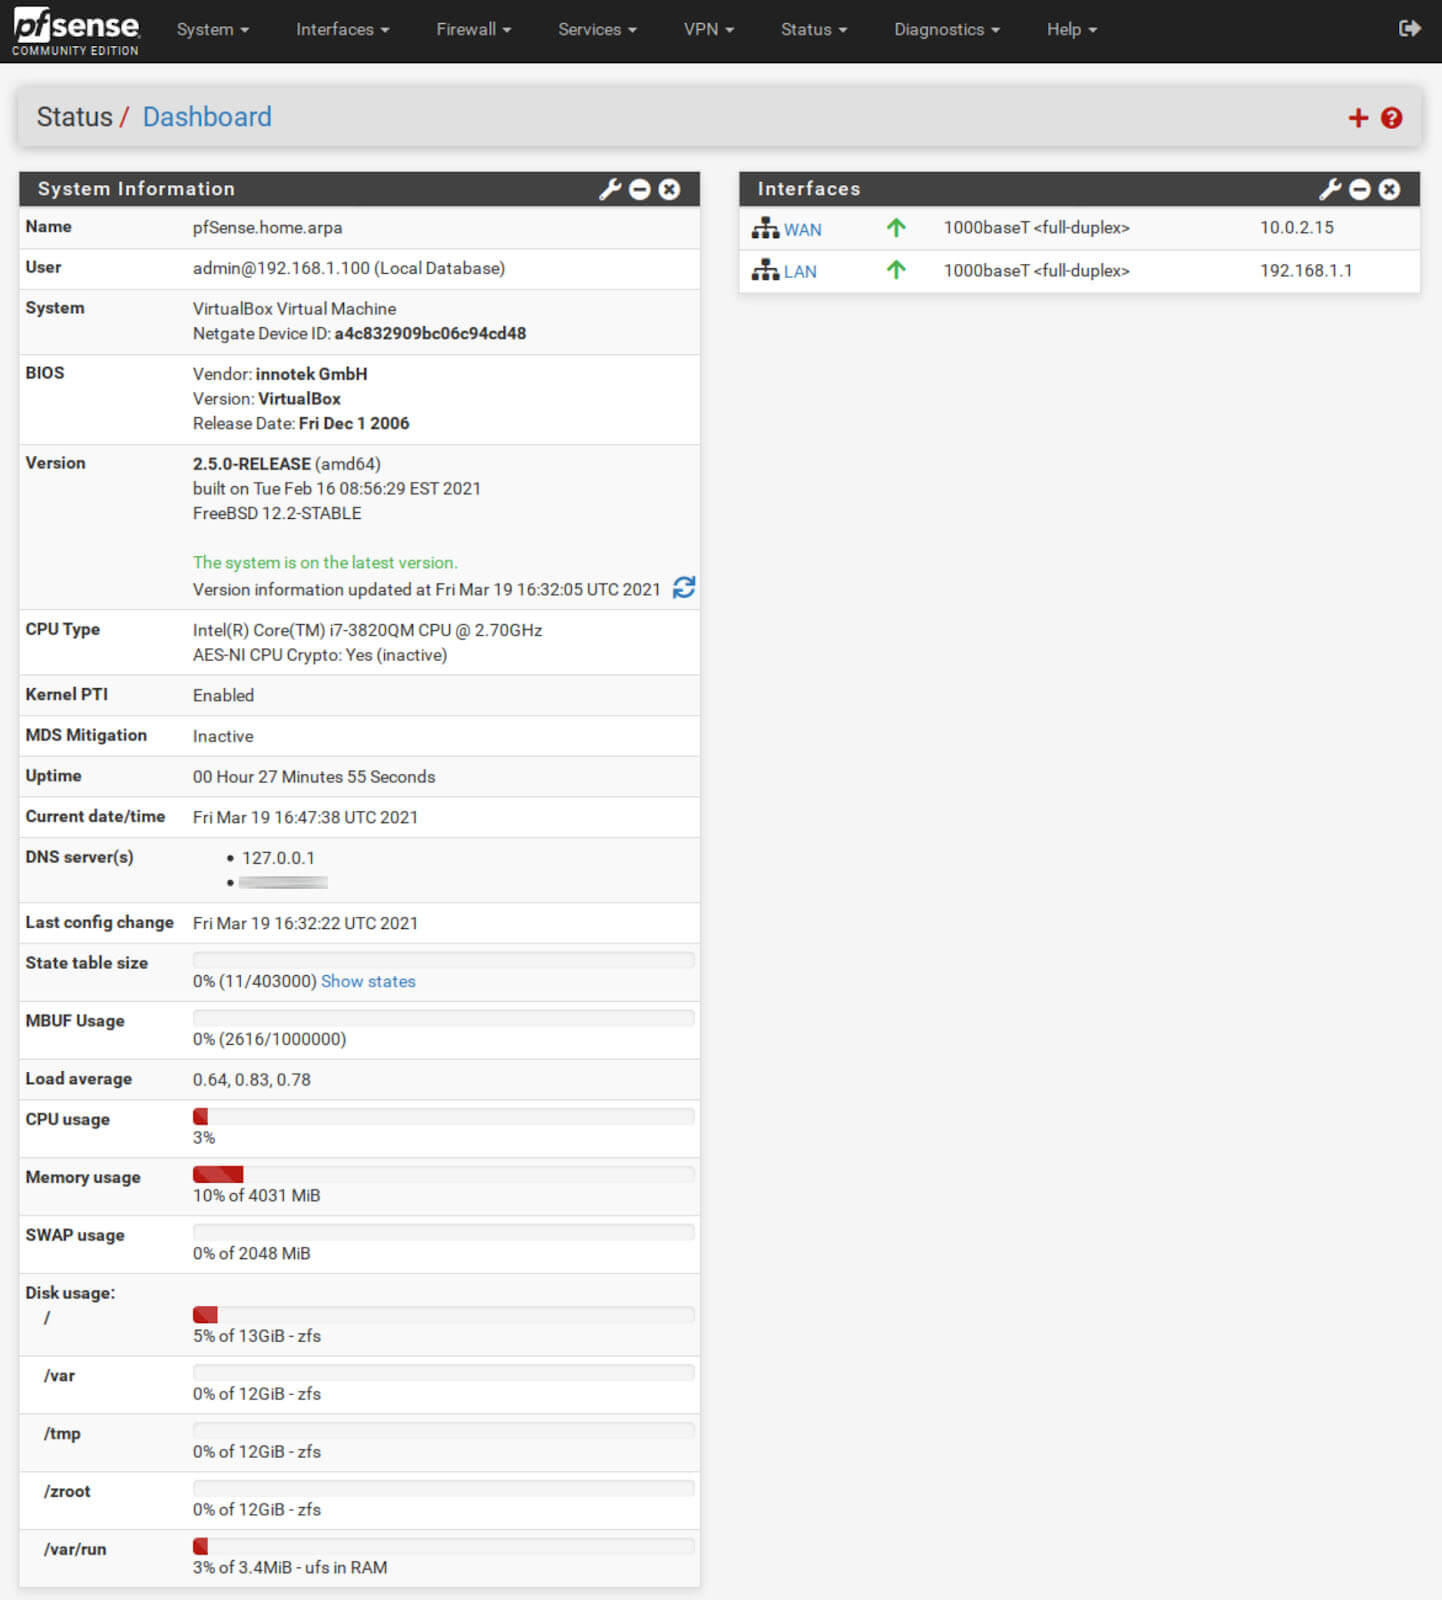
This guide assumes that you’ve got a working pfSense system configured with working WAN and LAN interfaces and that you’ve got GUI access.
Installing Squid
The first thing we need to do is install the Squid proxy server.
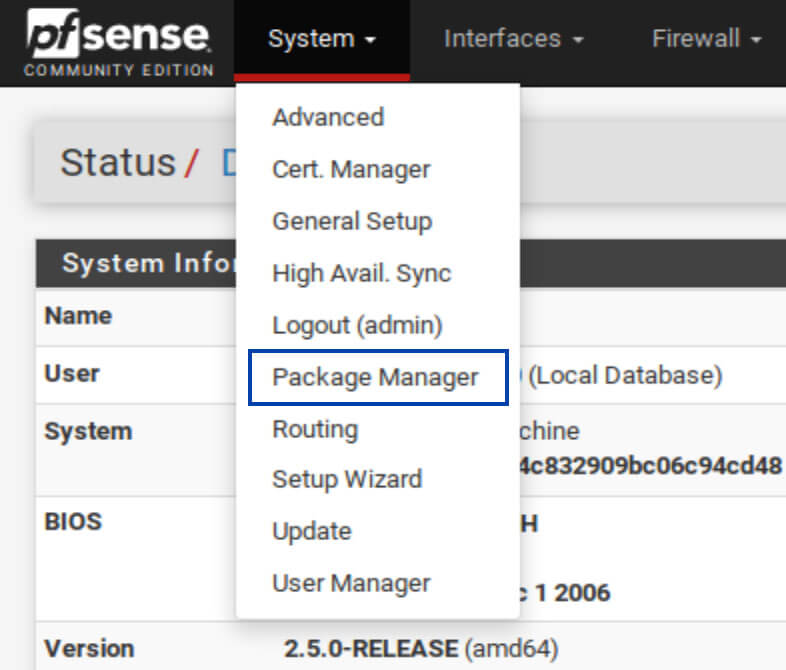
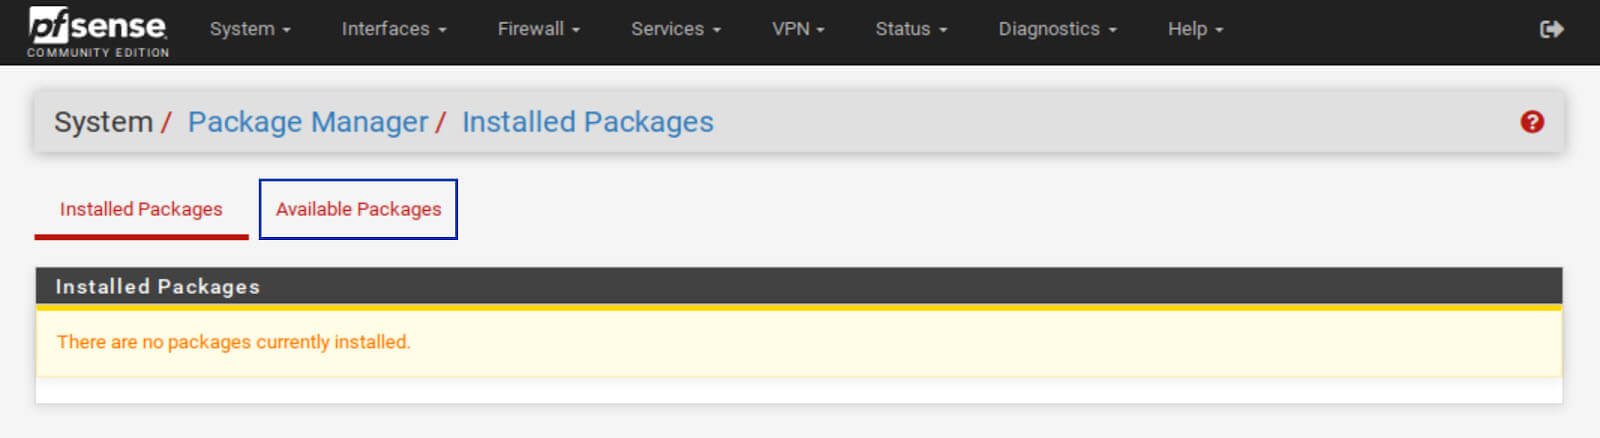
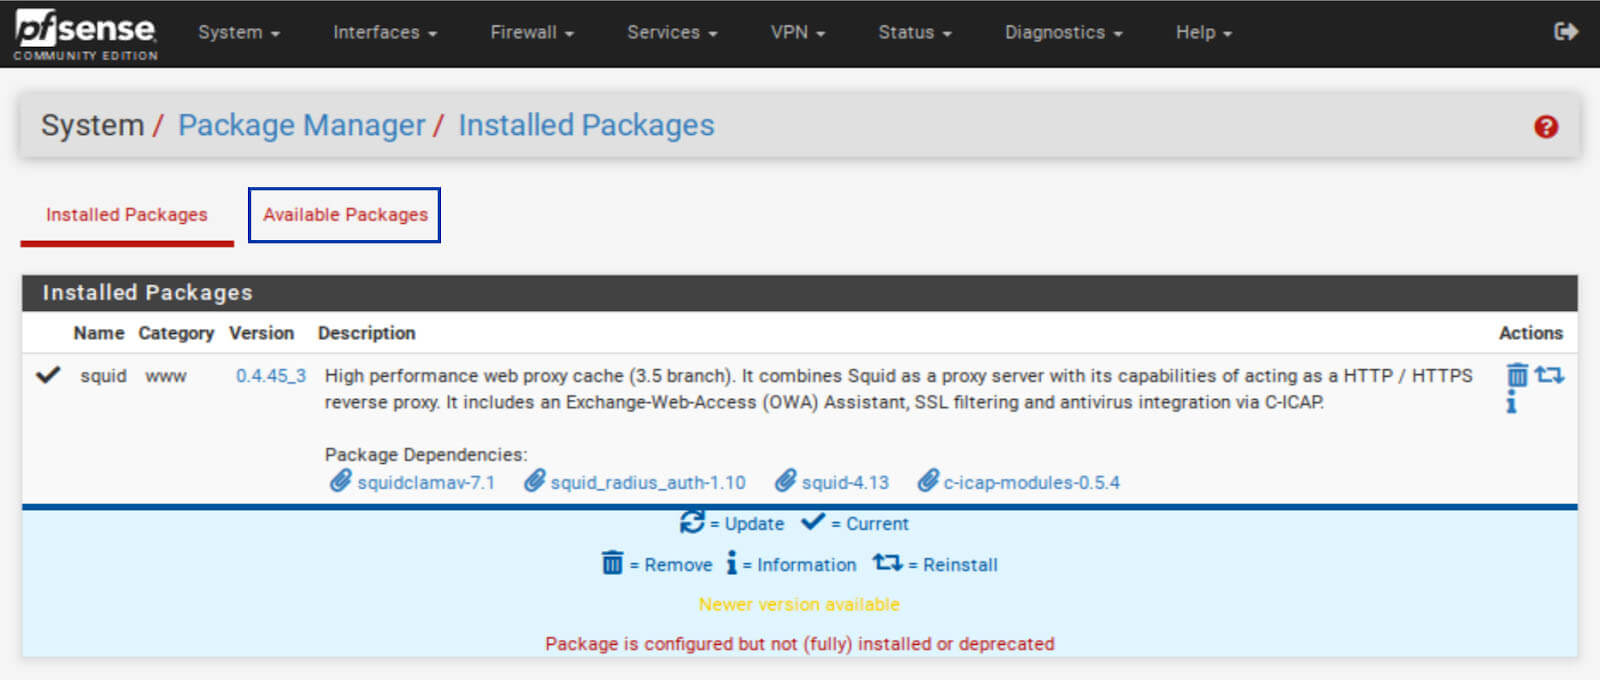
1. From the top menus, select System > Package Manager. You’re taken to the Installed Packages tab of the Package Manager.
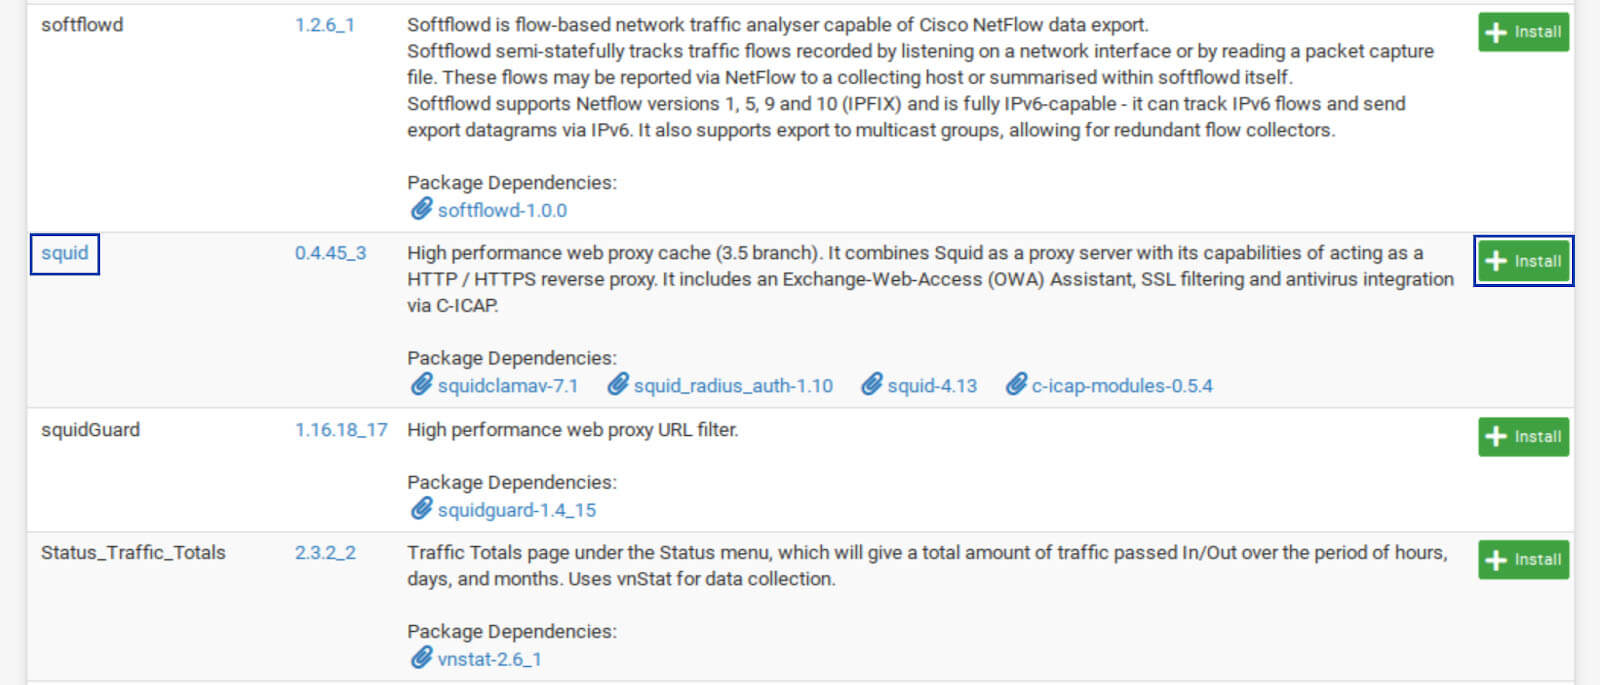
2. Select Available Packages. The list of available packages is displayed.
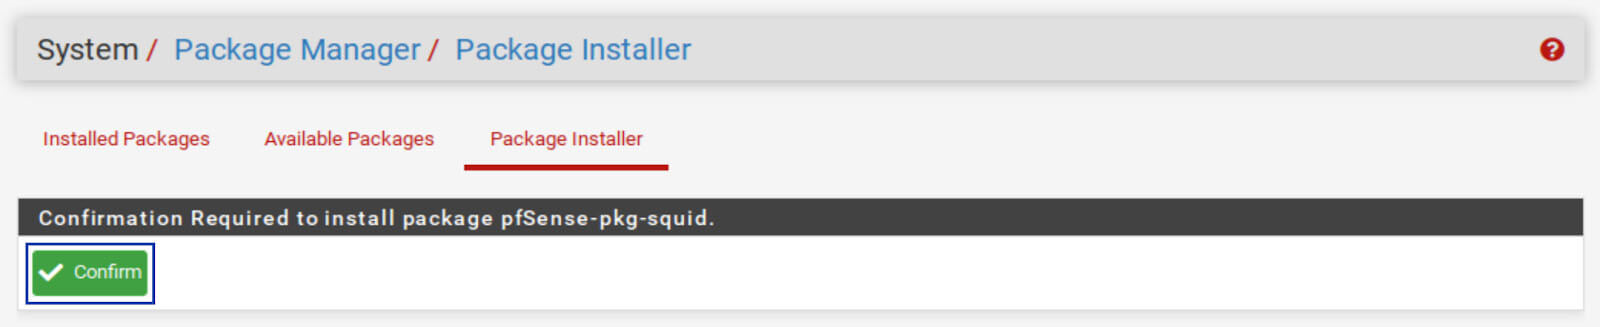
3. Scroll down until you see squid and click Install. The Package Installer window is displayed.
4. Click Confirm. The installation begins.
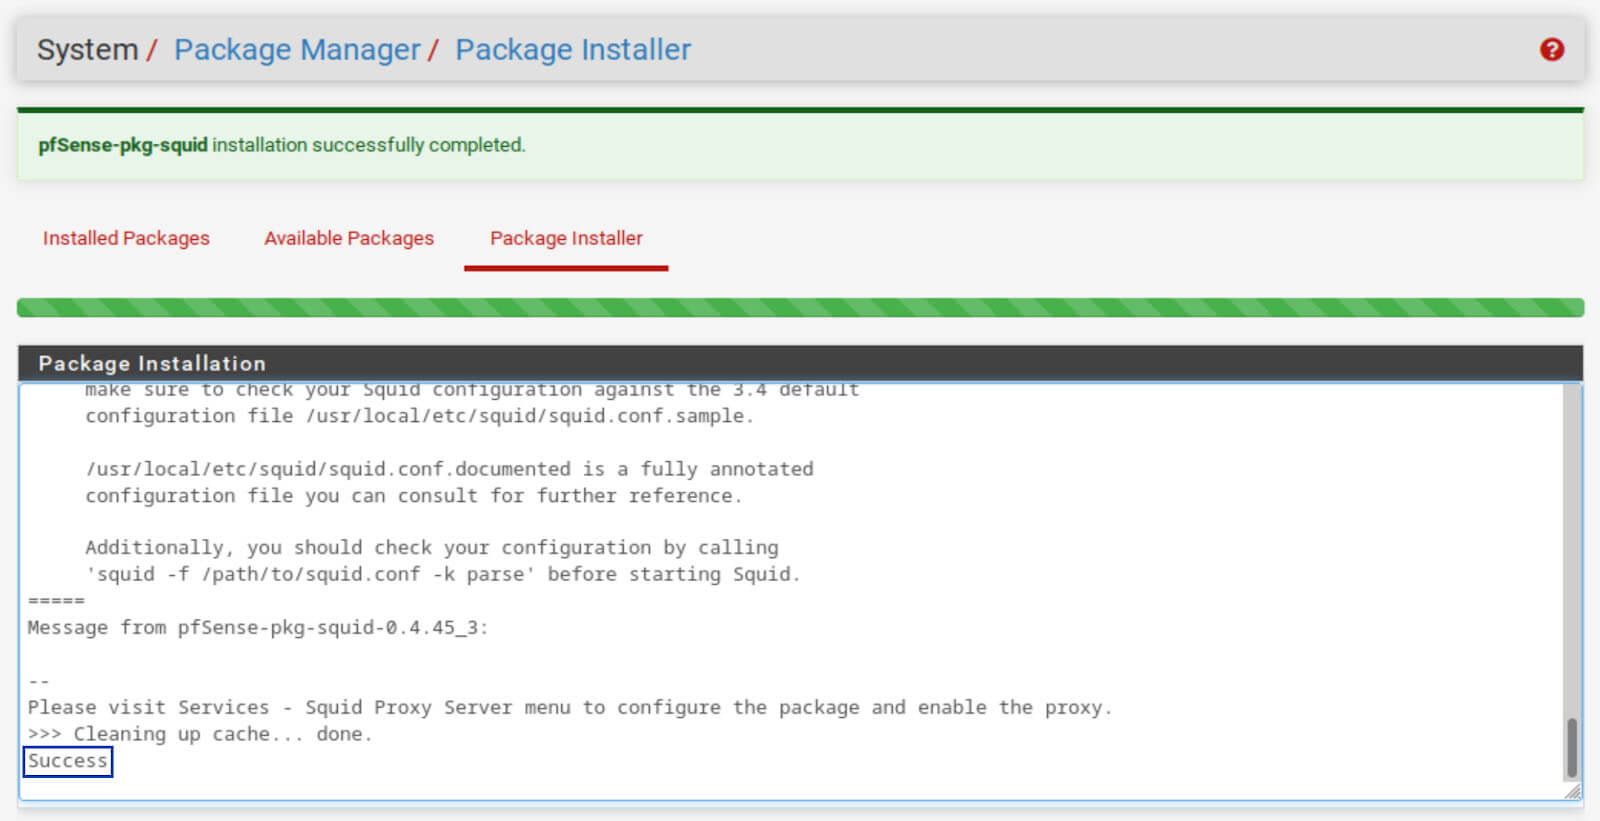
5. Once the installation is complete, you should see Success at the bottom of the Package Installer window. Squid is now installed.
Configuring Squid
Now that Squid is installed, we’ll configure our new proxy server.
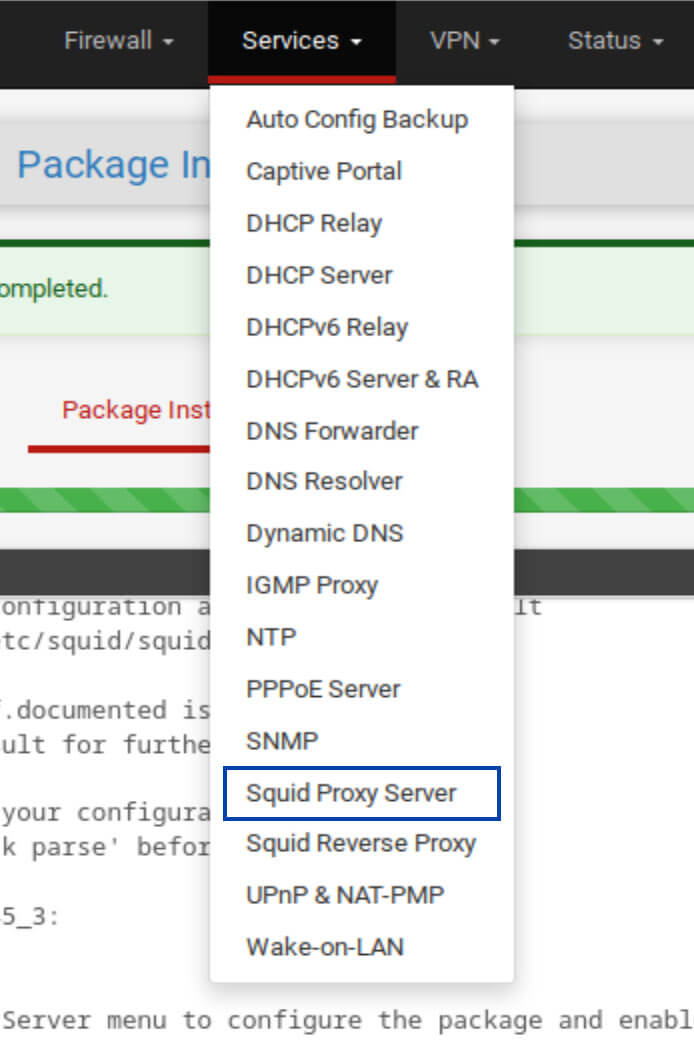
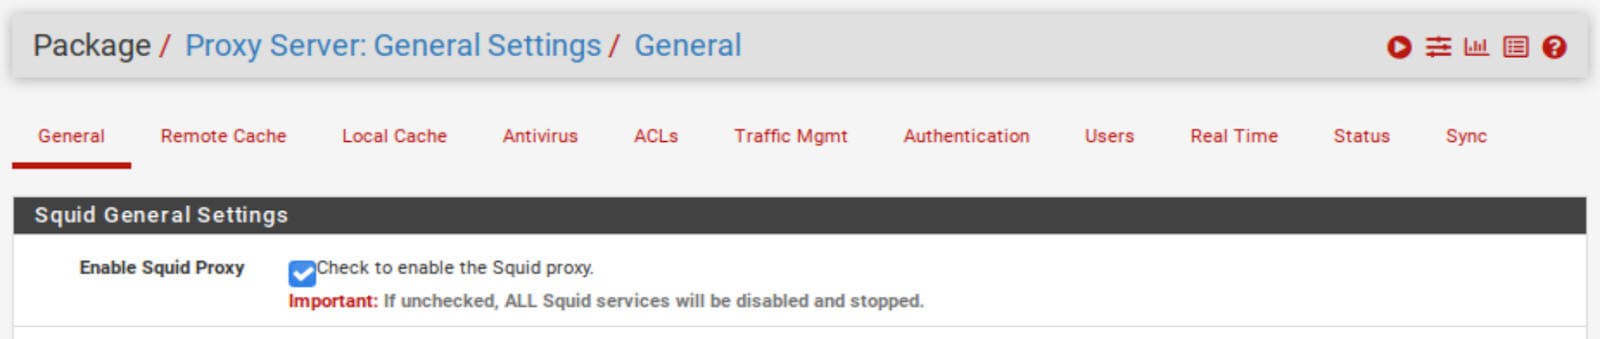
1. From the top menus, select Services > Squid Proxy Server. You’re taken to the General tab of the Squid Settings.
We’re going to go over configuring Squid section by section. Our purpose is to set up ad-blocking with Squid, so we’re not going to go into every sub-menu. Only the ones we need to achieve our goal. Any settings that are not mentioned should be left at their default values.
Before configuring Squid, we first need to go to the Local Cache tab and accept the default local caching settings by clicking Save at the bottom of the page.
If you try to configure the proxy without accepting the default local cache settings, you’ll be prompted to do so and lose the settings you configured so far.
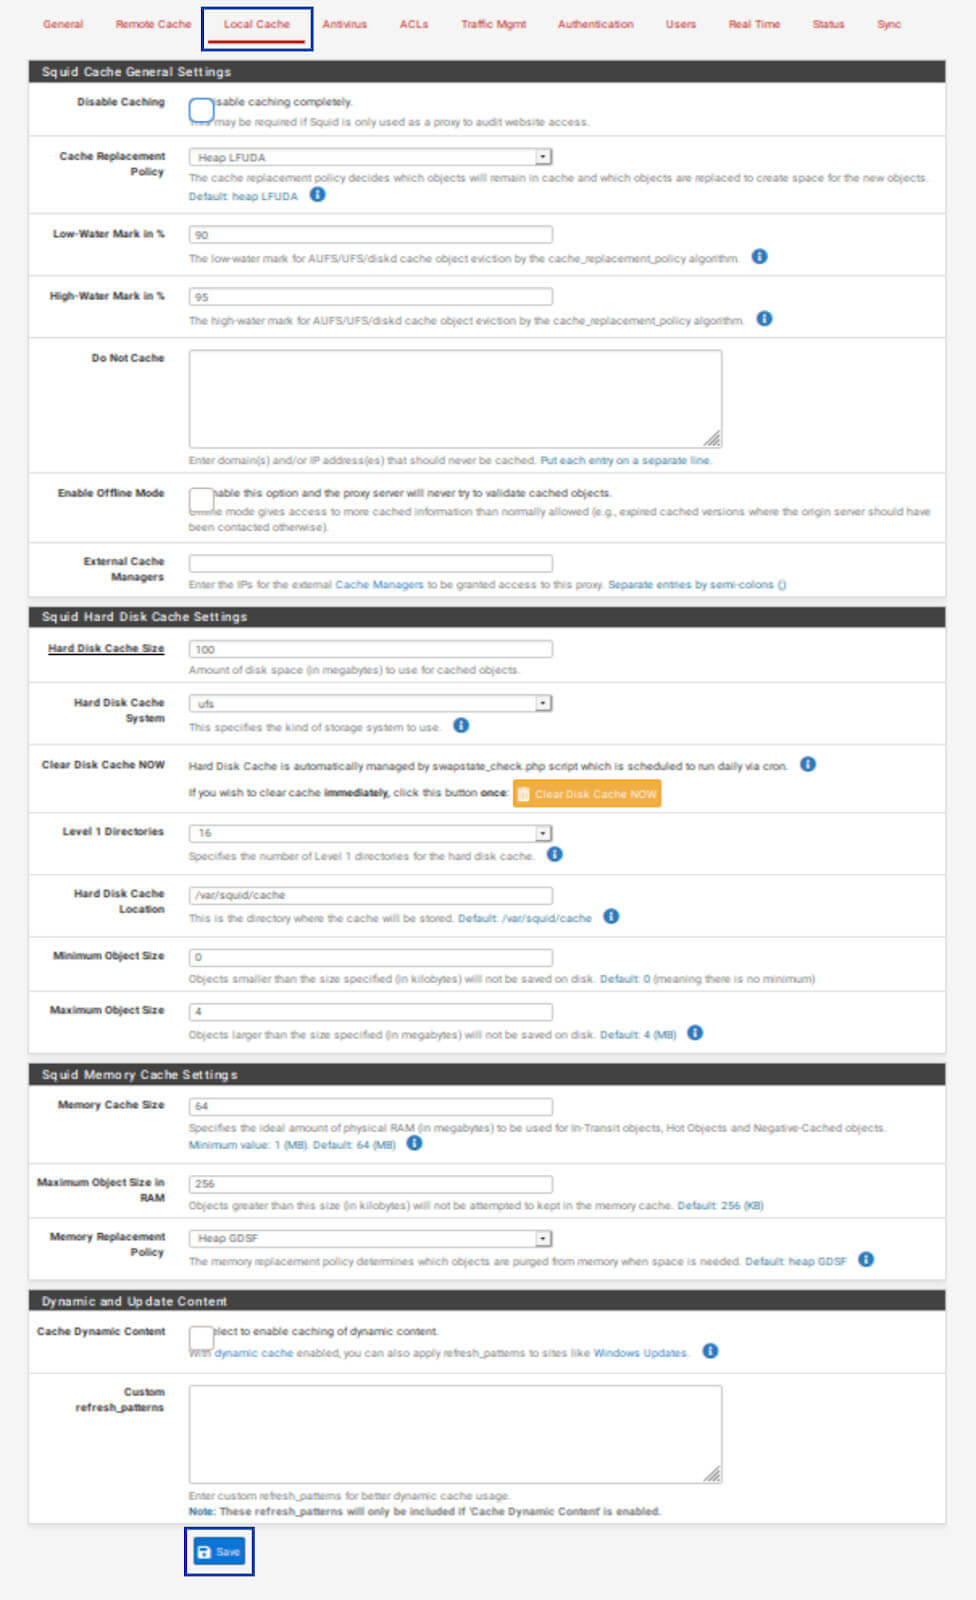
If you want to tweak your local cache settings later, you can do that from the Squid Settings Local Cache tab.
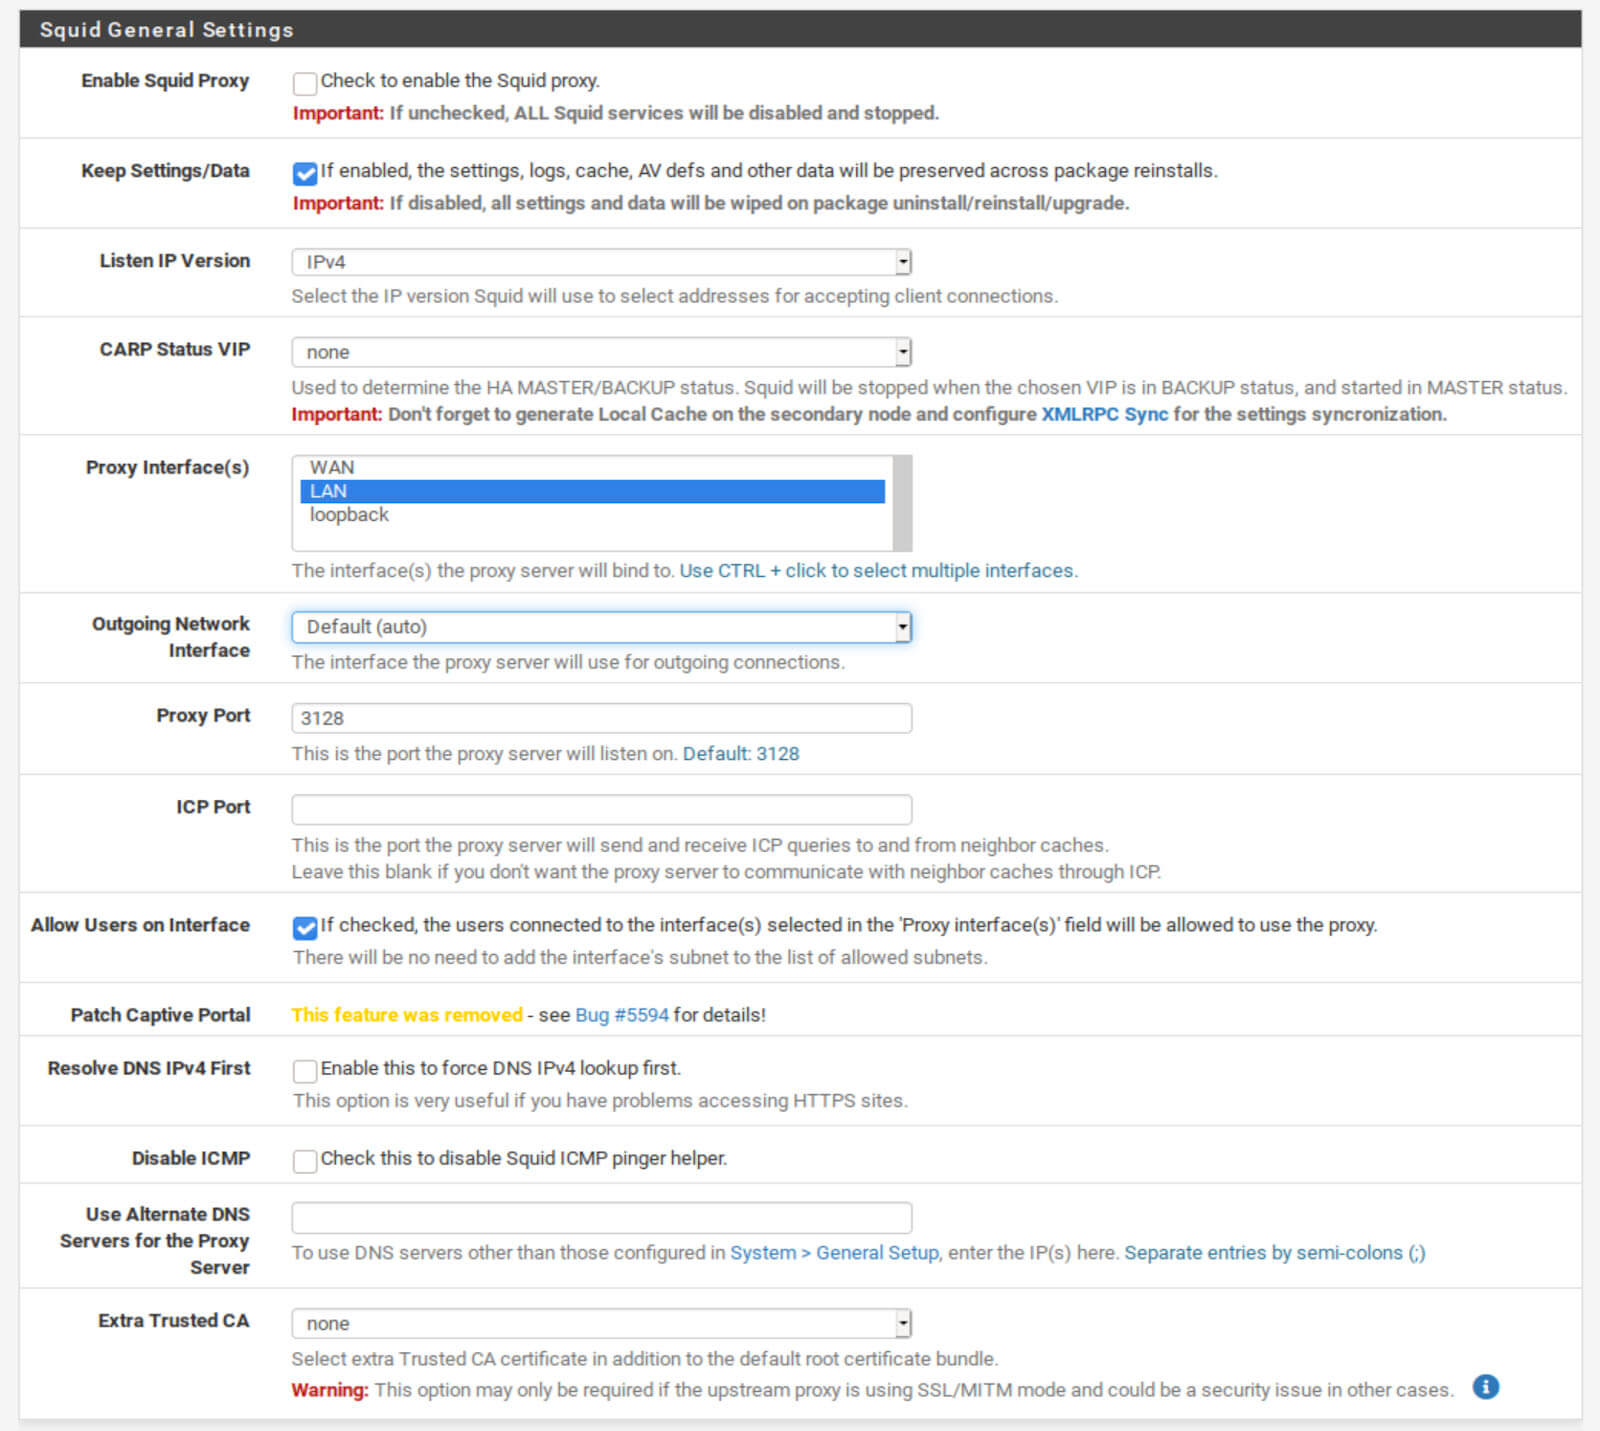
Squid General Settings
- Leave Check to enable the Squid proxy box unchecked for now. We will first configure our proxy server before we enable it.
- If your pfSense box is using both IPv4 and IPv6, select IPv4+IPv6 from the Listen IP Version drop-down menu. If not, leave it set to IPv4.
- Make sure LAN is selected in Proxy Interface(s). If you add additional interfaces to your pfSense box and want the traffic from those interfaces to go through Squid, you’ll need to select them here.
- Set the Outgoing Network Interface to Default (auto).
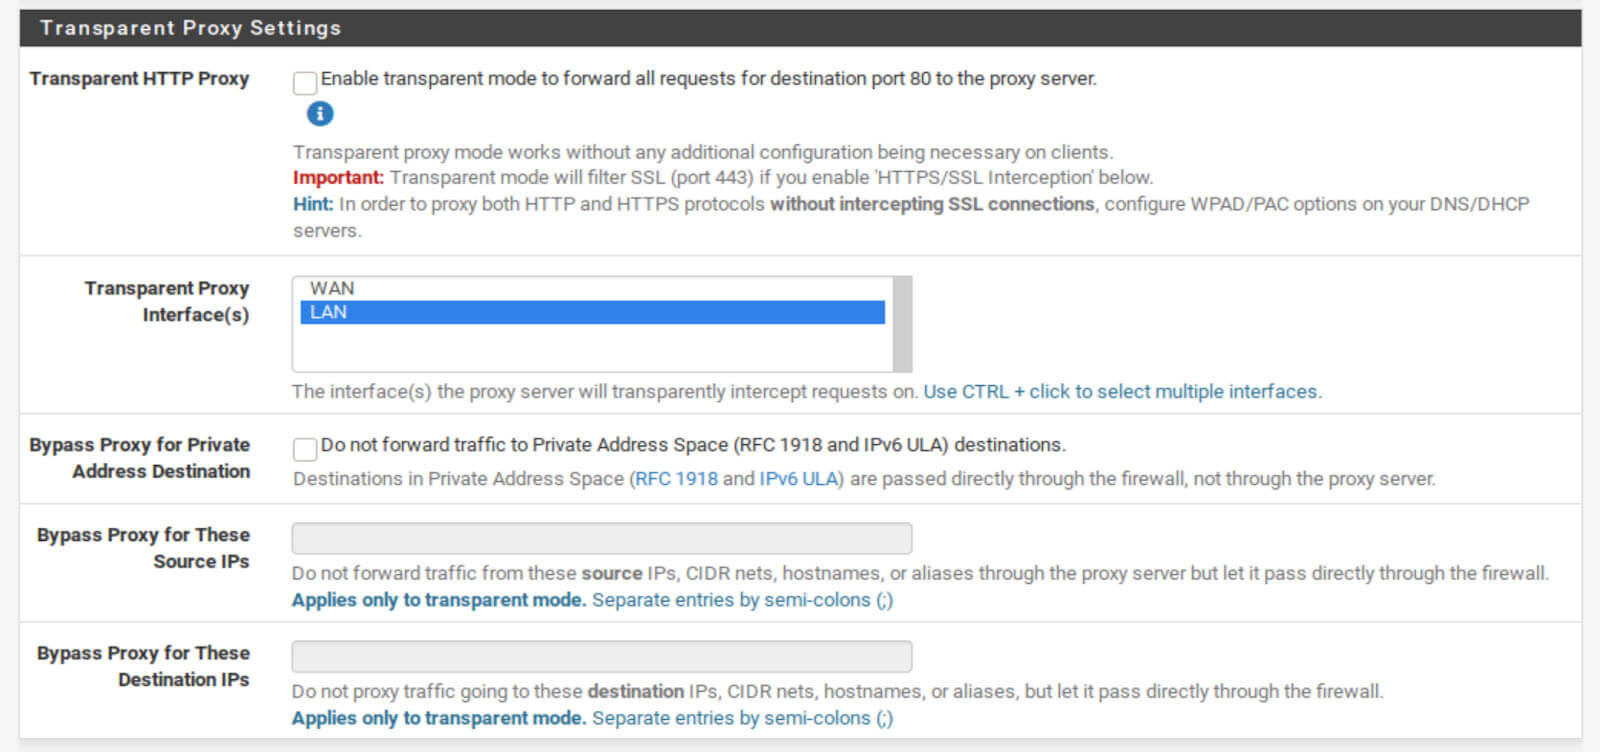
Transparent Proxy Settings
Proxy servers can work in one of two ways: transparent or explicit. In transparent mode, no configuration is required on your clients (computer, tablet, smartphone, etc.) – their traffic will be transparently proxied.
However, this mode will only proxy HTTP traffic over port 80, not HTTPS traffic (unless you configure Man In the Middle SSL filtering – more on that below). Since most internet traffic uses HTTPS, the transparent mode has limited scope for ad-blocking but can still be useful for caching.
The explicit mode requires you to configure each client to “request” access to the proxy. And in this mode, all TCP internet traffic is proxied (HTTP and HTTPS). This is what we want in this guide. So we’re not going to enable the Transparent mode in this guide, but you can help both modes without issue.
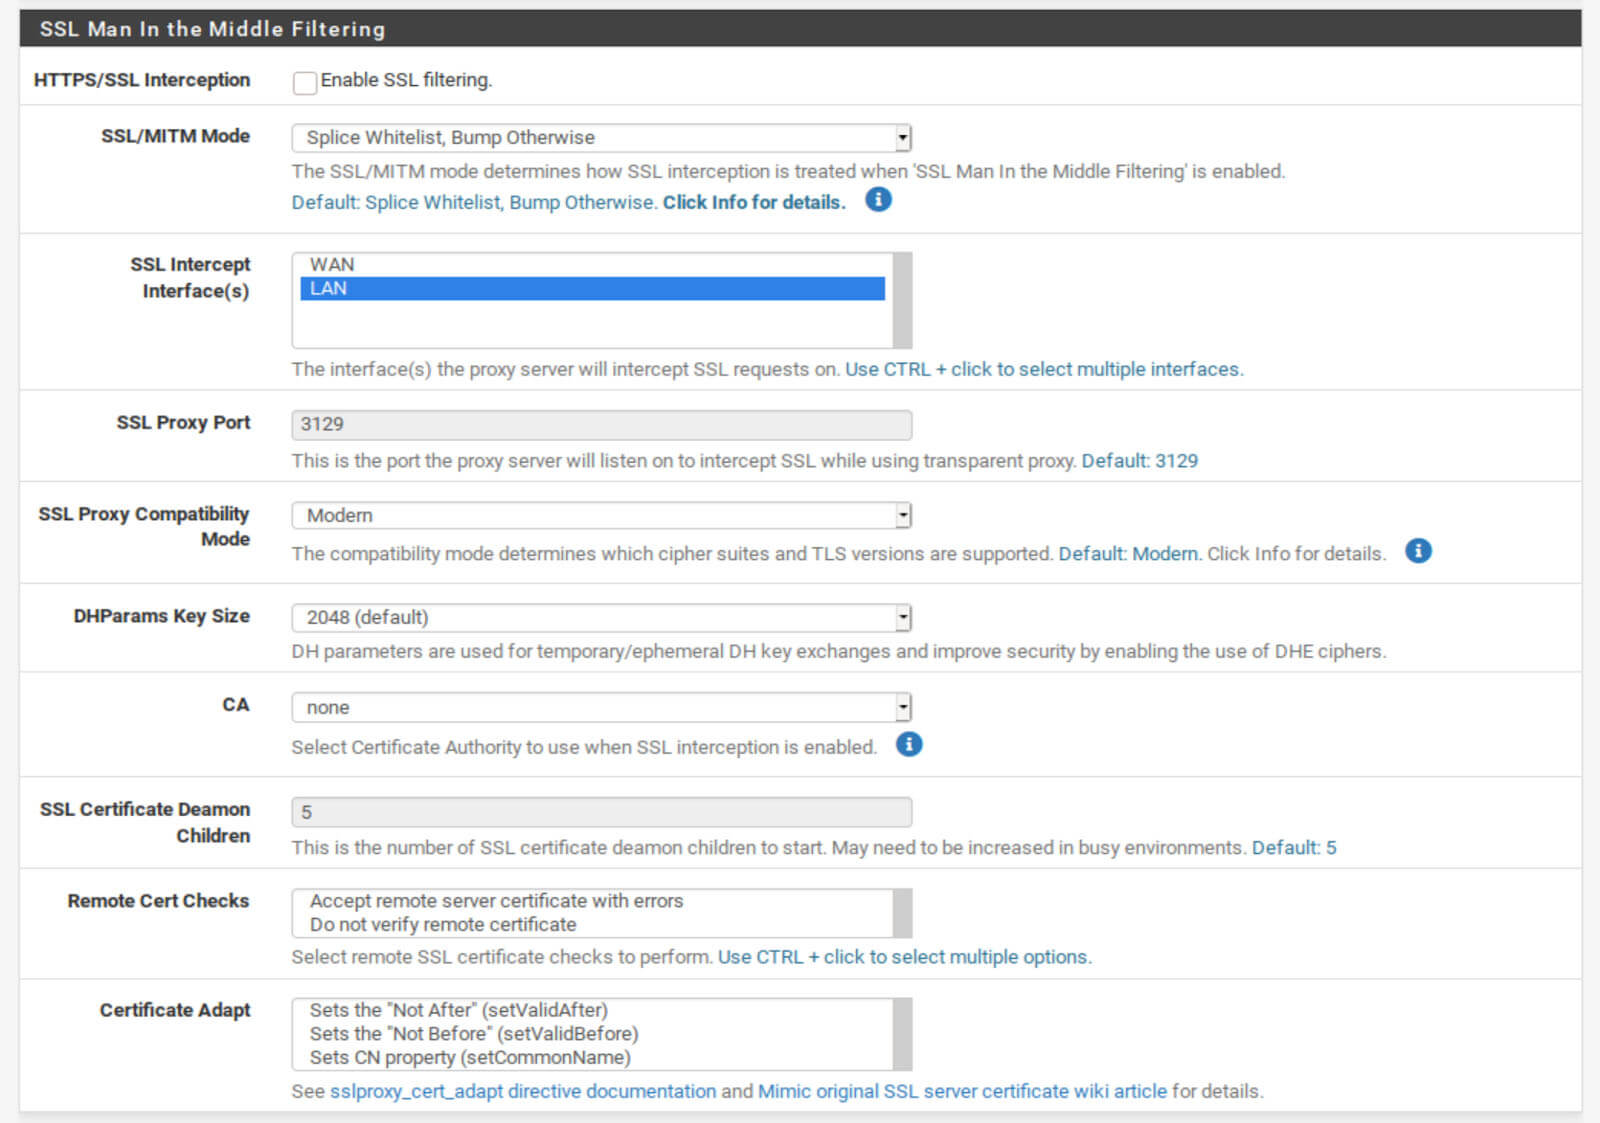
SSL Man In the Middle Filtering
As I mentioned above, it’s possible to transparently proxy HTTPS connections. But to do this, you essentially need to break HTTPS.
Squid can replace the proper SSL certificate from the website you’re trying to access with its own, decrypt the connection, and re-encrypt it with its certificate. This enables you to filter SSL connections but also breaks the HTTPS validation that is meant to happen in your browser.
I don’t recommend Man In the Middle SSL filtering except for specific purposes by people who understand what they’re doing. We’re going to leave this feature disabled as well.
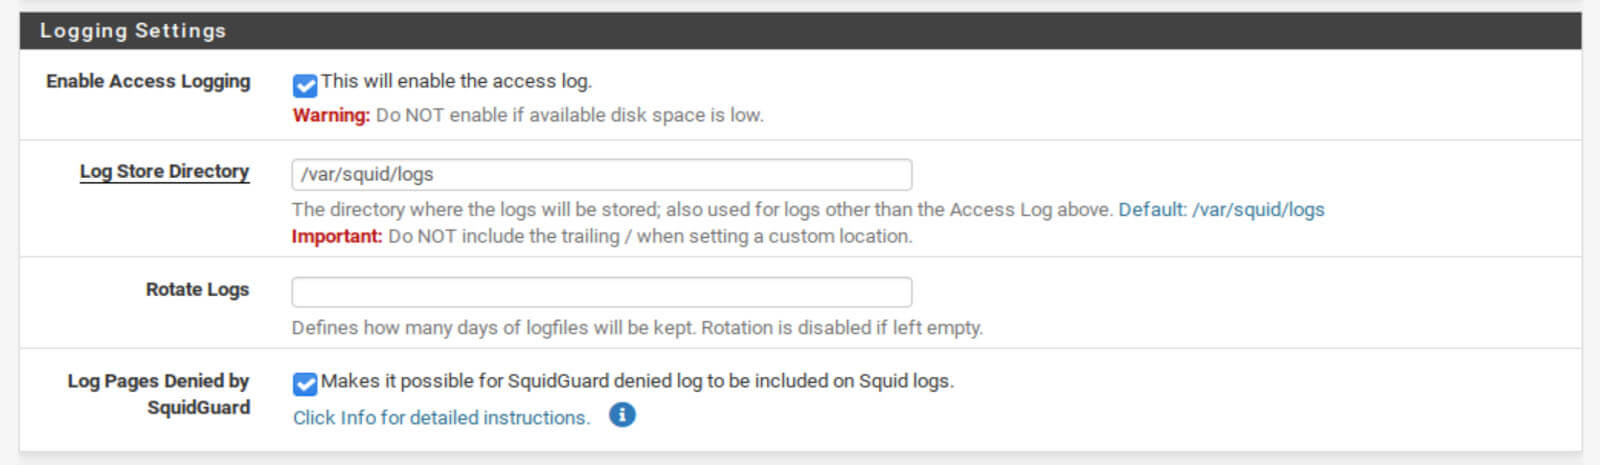
Logging Settings
- Check the Enable Access Logging box. This will log your Squid traffic so you can see how Squid is behaving if you need to troubleshoot anything.
- Check the Log Pages Denied by SquidGuard box. This enables the SquidGuard logs to be viewed from the Real Time tab alongside the Squid Proxy logs. This will be useful once we’ve installed SquidGuard.
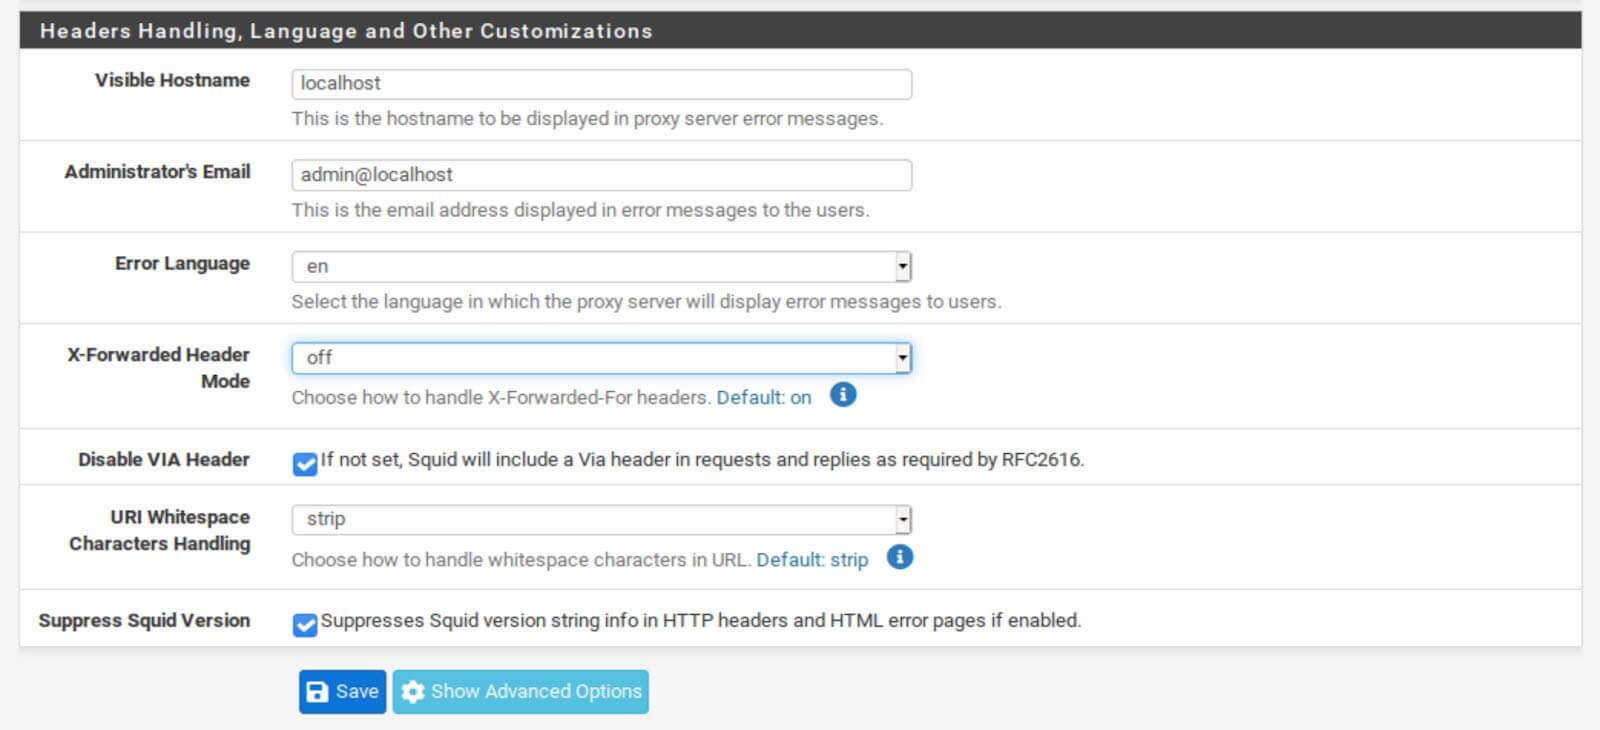
Headers Handling, Language and Other Customizations
The settings here are optional but will limit the amount of information displayed in the Squid headers.
- Set the X-Forwarded Header Mode to off.
- Check the Disable VIA Header box.
- Check the Suppress Squid Version box.
- Click Save.
ACLs Tab
To see what we can explicitly block with Squid, we need to go to the ACLs tab.
We can see that we have multiple boxes to define different elements for Squid to filter out. Let’s look at each one.
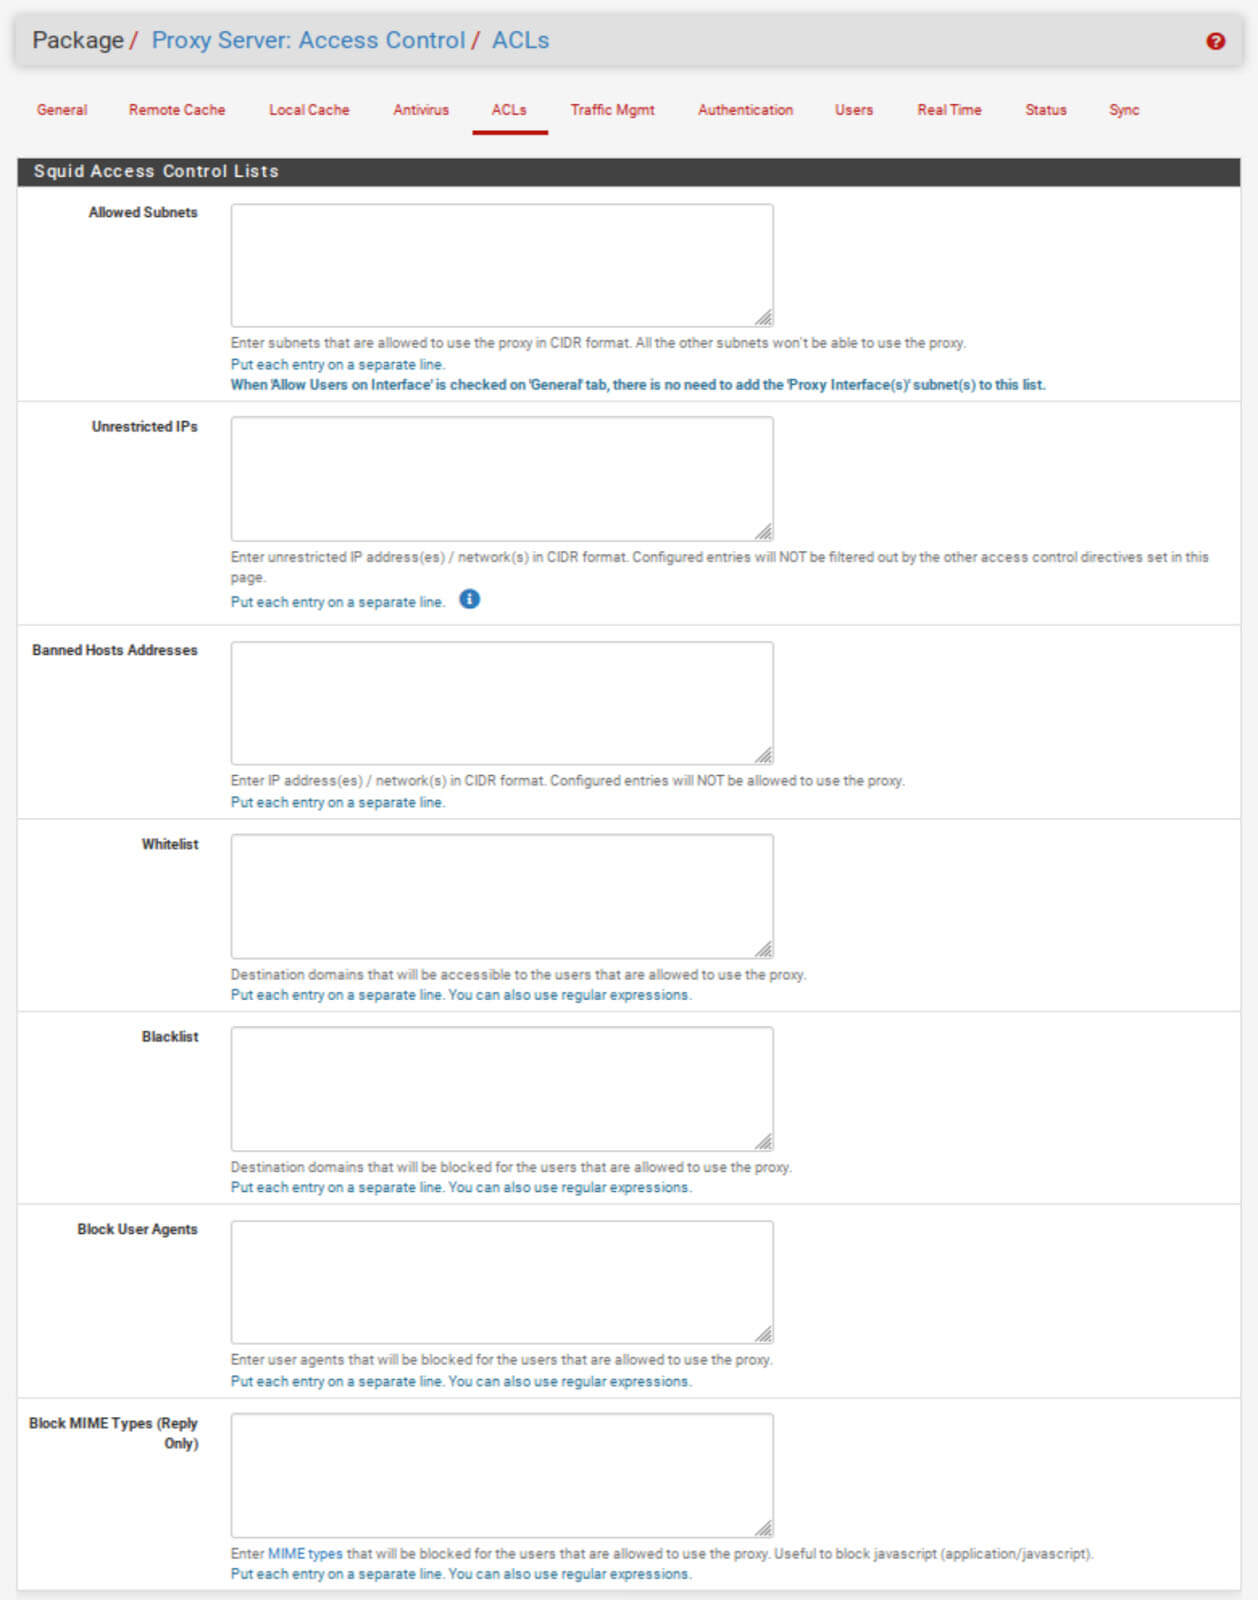
Allowed Subnets
You can add additional subnets to go through the Squid proxy here. This is useful for subnets that aren’t tied to an interface on the system, such as IPSec. No need to add anything here in our example.
Unrestricted IPs
The IP addresses listed here will not have their traffic filtered by the proxy server.
Banned Host Addresses
The IP addresses listed here will not be allowed to use the proxy server even if its subnet is permitted.
Whitelist
The domains listed in the Whitelist box will be available to all hosts authorized to use the proxy. The whitelist entries override any blacklist entries.
Blacklist
The domains listed in the Blacklist box will be inaccessible to all hosts that are allowed to use the proxy server.
Block User Agents
This box is extremely handy for blocking specific applications from accessing the internet. When an application requests out to the internet, its headers include a field referred to as the user agent. The user agent identifies the application being used. As an example, Google Chrome’s user agent is Chrome.
User agents were initially used to identify the web browser making a web request to a server so that the server would know how to render the requested data in that specific browser. But their usage is now generalized to any app-making requests over the internet.
To block a user agent in Squid, you need to prefix it with “^” (without quotes).
So, listing ^Chrome in Squid’s Block User Agent box will block Google Chrome from accessing the internet.
Listing ^Mozilla would block Firefox from accessing the internet. Listing ^WhatsApp would block WhatsApp from accessing the internet.
User agents are quite specific and aren’t always as simple as the examples above. You need to know the exact user agent an app uses to be able to block it here.
Block MIME Types (Reply Only)
MIME in MIME types stands for Multipurpose Internet Mail Extensions, which are used to define file types within URLs. MIME types are structured as follows:
type/subtype
So, adding audio/mpeg to the Block MIME Types box would block the downloading of mp3 files. Adding image/png to the Block MIME Types box would block the downloading of png images.
As was the case with user agents, MIME types are very specific. You need to enter the exact type and subtype for the filtering to work in Squid.
Testing Squid
Adding an entry to Squid’s blacklist
Let’s go ahead and test our Squid installation to ensure everything is working correctly before moving on to the next steps. We will enter a domain in the Blacklist box to see if Squid will block it as expected.
1. From the ACLs tab of the Squid Proxy Settings, enter facebook.com in the Blacklist box.

2. Click Save at the bottom of the page.
3. Go to the General tab of the Squid Proxy Settings.
4. Check the Enable Squid Proxy box.
5. Click Save at the bottom of the page.
Our proxy server is now enabled and configured to block facebook.com.
We’ll quickly configure our web browser to go through the proxy server to see if it’s working properly. If everything is correctly configured, I should not be able to access facebook.com.
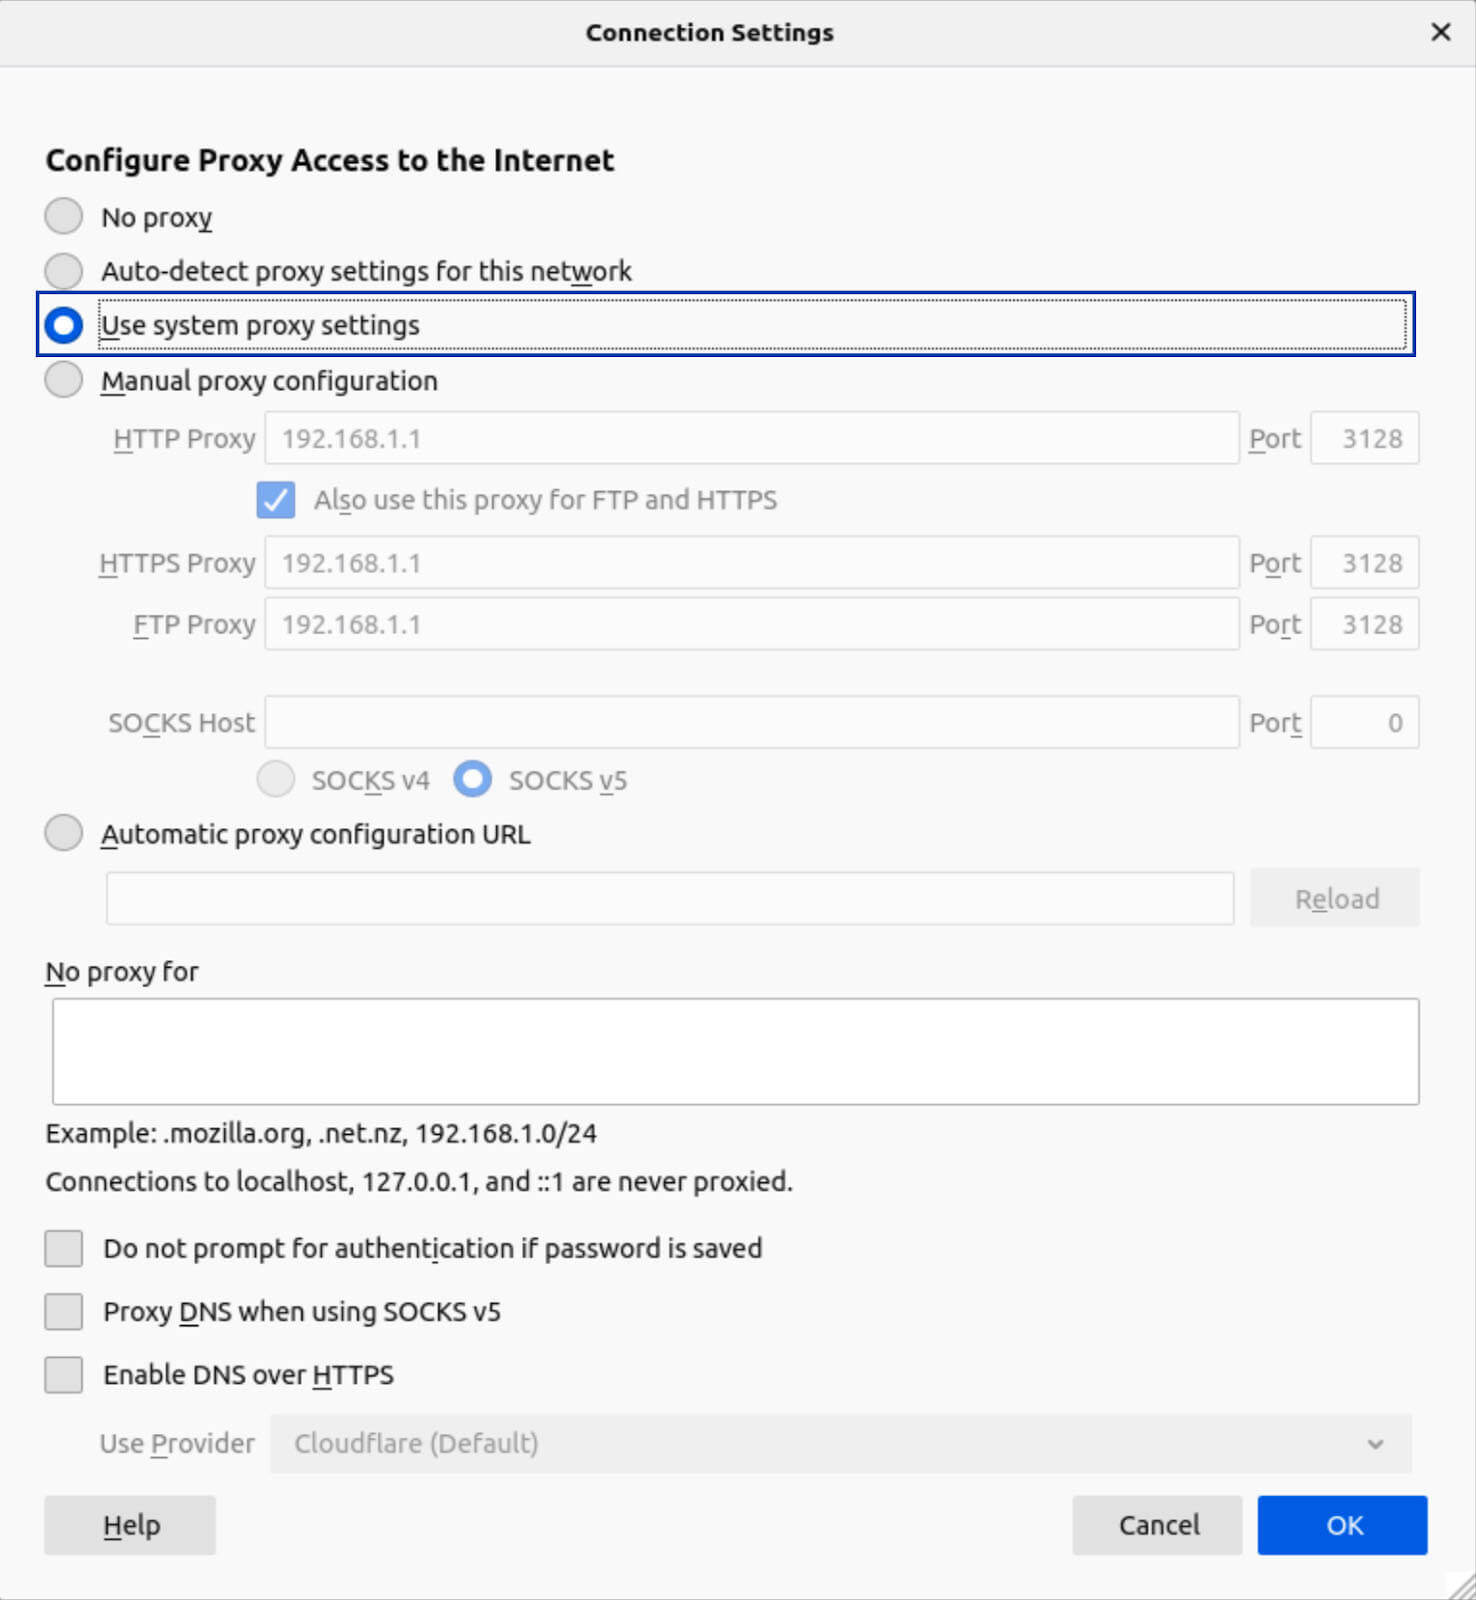
Configuring Firefox to use the proxy server
1. Click the Settings icon at the browser’s top right and select Preferences (this is called Options in Windows). You’re taken to the General Settings page.
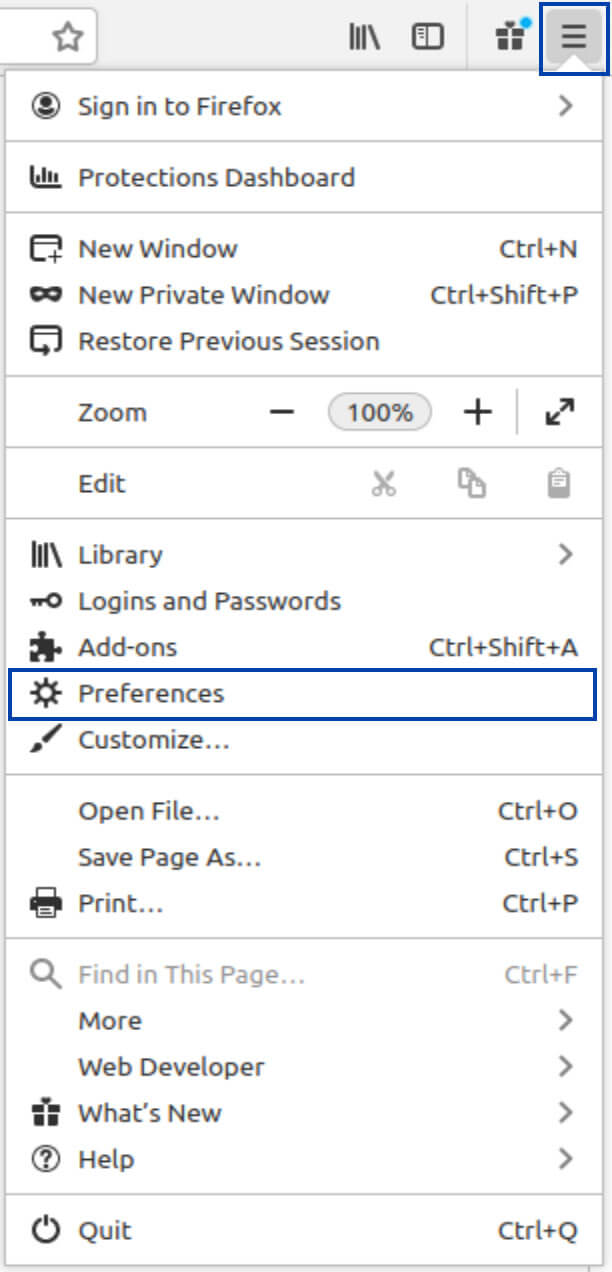
2. Scroll down the General Settings page to the Network Settings section, and click the Settings button.

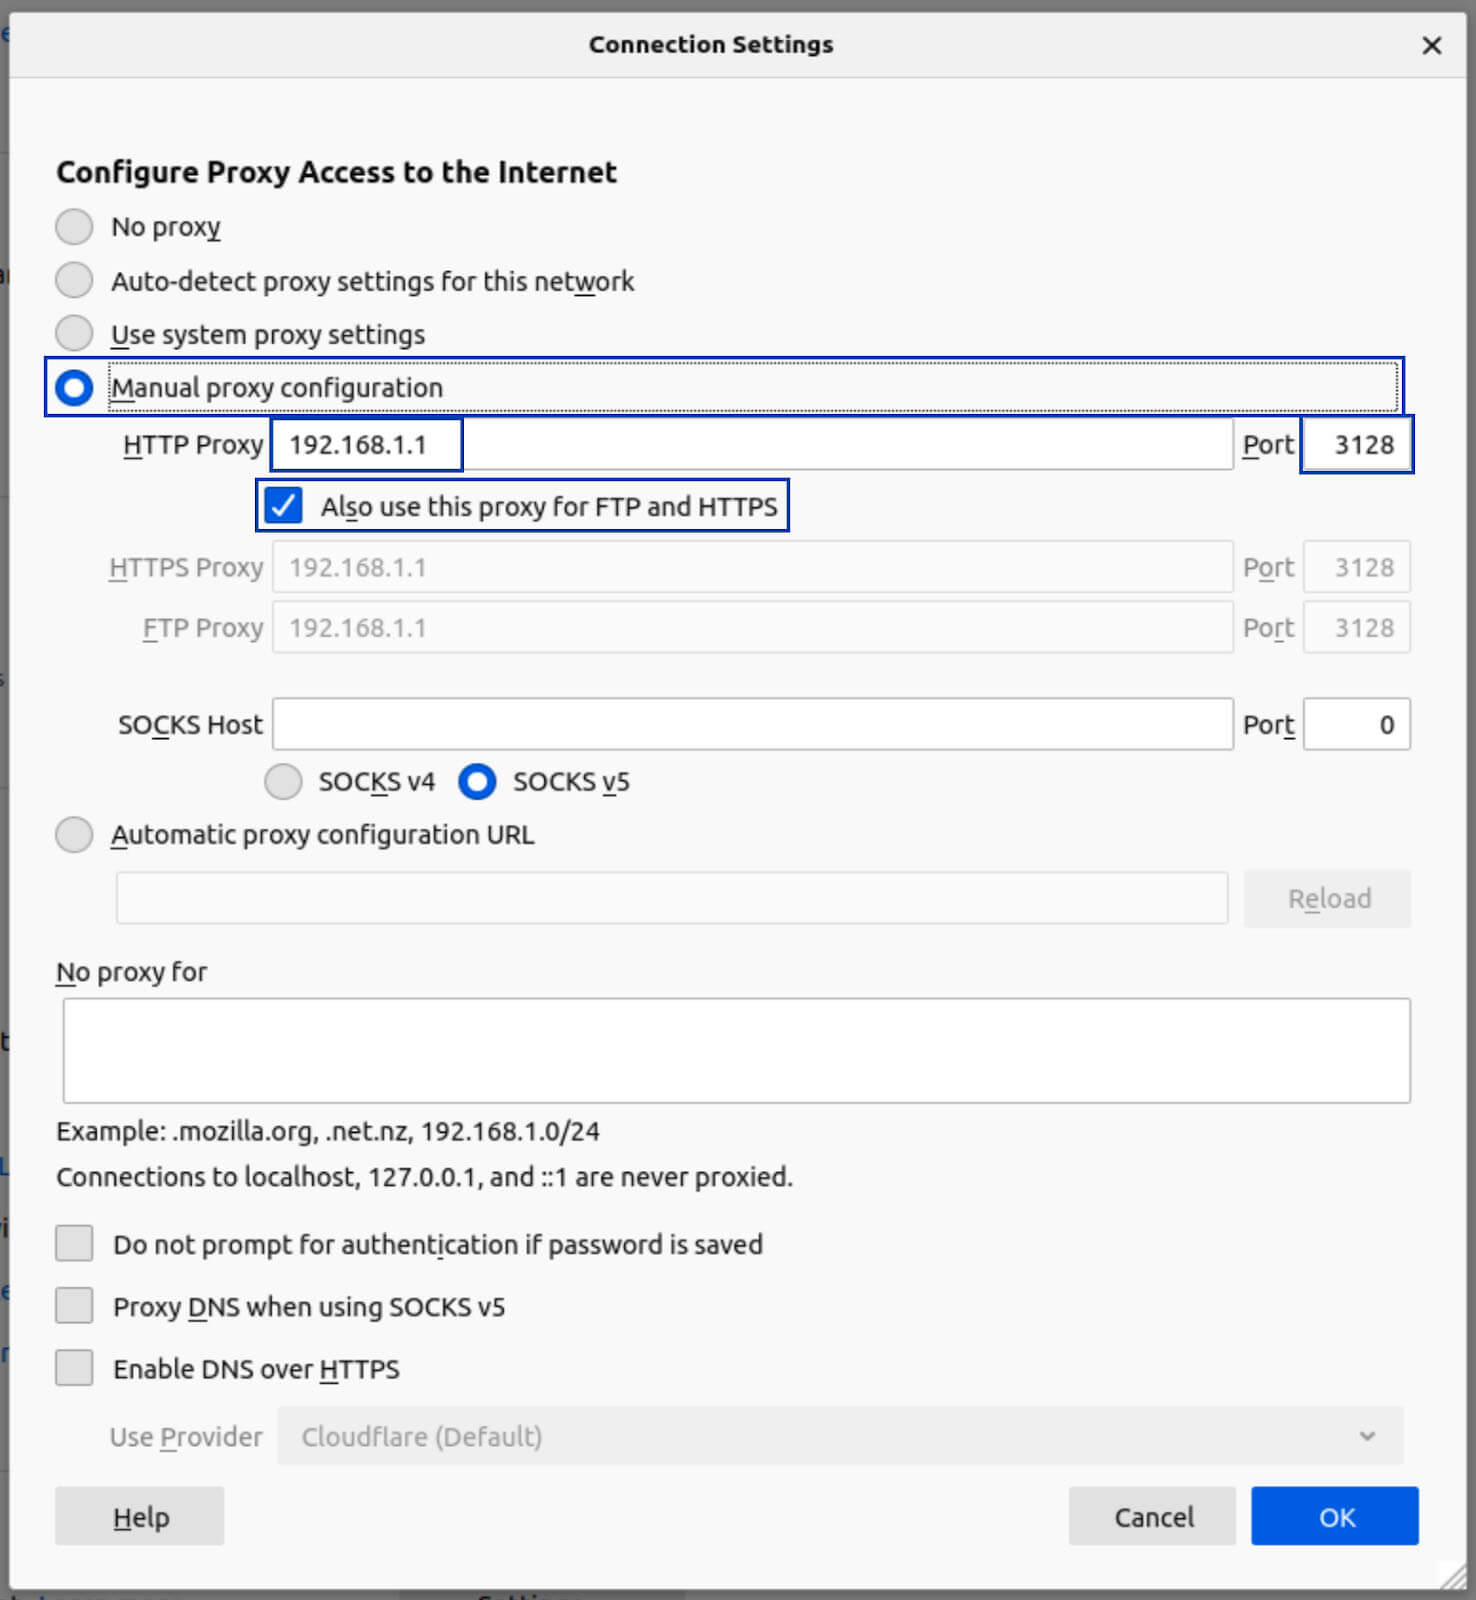
3. Select Manual Proxy Configuration.
4. In the HTTP Proxy box, put the IP address of your pfSense box. In my case, this is 192.168.1.1.
5. Set the Port field to 3128.
6. Tick the Also use this proxy for FTP and HTTPS box.
7. Click OK at the bottom of the window, and close the Settings page.
Now, if I try and access facebook.com (over HTTP or HTTPS), my browser displays the following page:
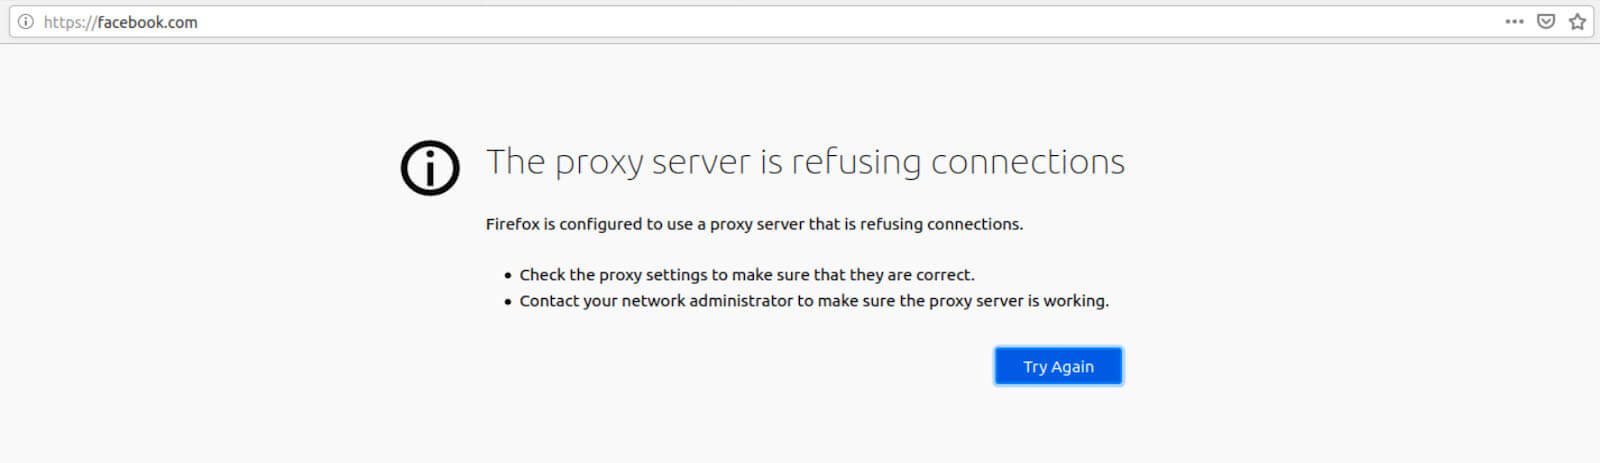
That’s exactly what we want.
SquidGuard
So we now have a working proxy server configured to block facebook.com. Great. However, if we want to block ads, we will have to add thousands upon thousands of domains to Squid’s Blacklist box. Not exactly optimal…
Enter SquidGuard. SquidGuard is an add-on module to Squid that can handle list-based filtering.
With list-based filtering, you enter the URL to a list of blacklisted domains, and any domains that match the domains on the blacklist are blocked.
Now that our basic Squid proxy server is up and running, we’ll go ahead and install and configure SquidGuard.
Installing SquidGuard
1. From the top menus, select System > Package Manager. You’re taken to the Installed Packages tab of the Package Manager.
2. Select Available Packages. The list of available packages is displayed.
3. Scroll down until you see SquidGuard and click Install. The Package Installer window is displayed.
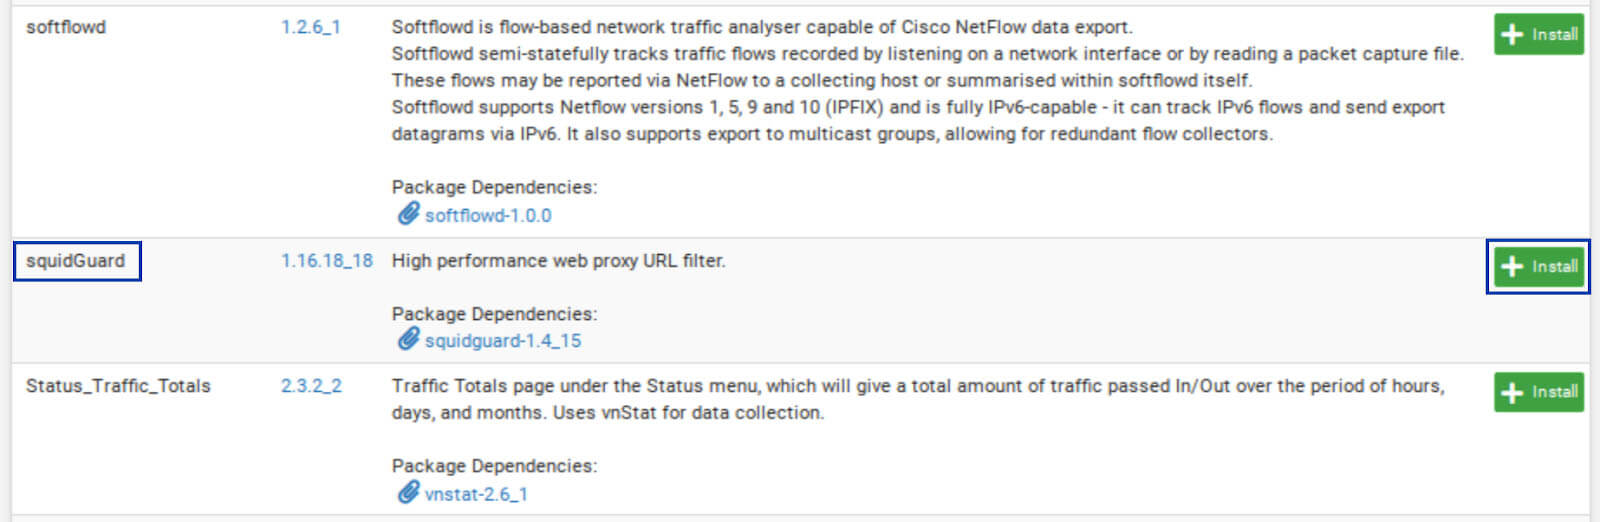
4. Click Confirm. The installation begins.

5. Once the installation is complete, you should see Success at the bottom of the Package Installer window. SquidGuard is now installed.

Configuring SquidGuard
SquidGuard is now installed. Let’s go ahead and configure list-based filtering.
1. From the top menus, select Services > SquidGuard Proxy Filter. You’re taken to the General tab of the SquidGuard Proxy Filter Settings.

As was the case when configuring Squid itself, we will go over configuring Squid Guard section by section. And again, we’re not going to go into every sub-menu – only the ones we need to configure to achieve our goal. Any settings that are not mentioned should be left at their default values.
General Options
1. Leave the Enable box unticked for now.

Logging options
- Check the Enable GUI log box.
- Check the Enable log box.
- Check the Enable log rotation box.

Miscellaneous Options
1. Check the Clean Advertising box.

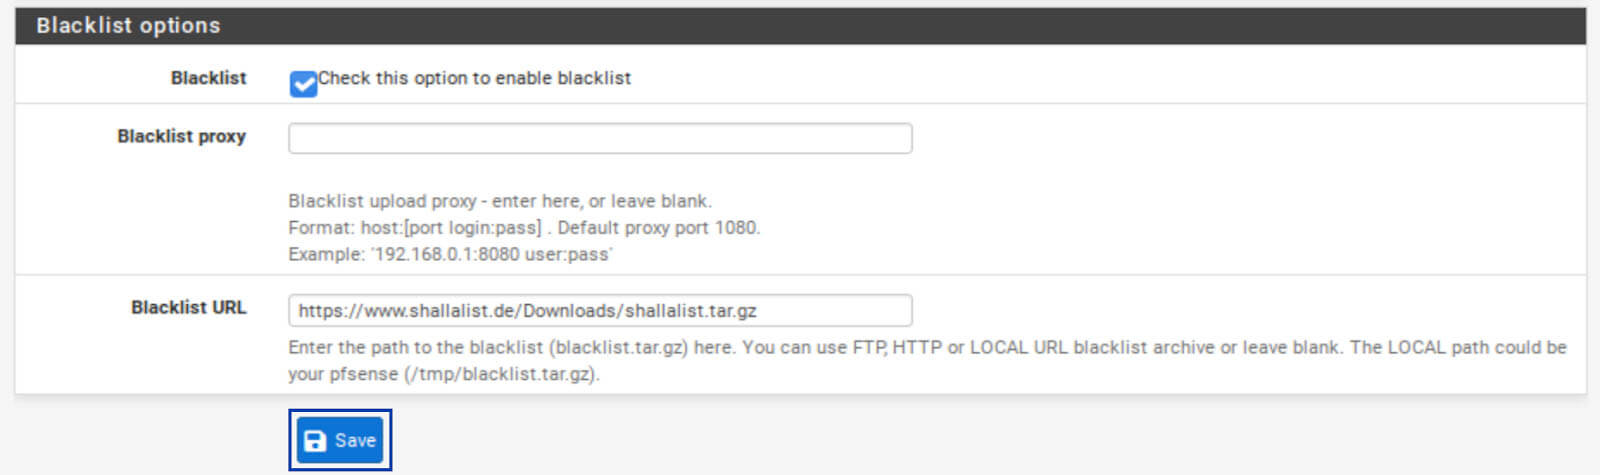
Blacklist options
1. Tick the Blacklist box.
2. Enter the following URL in the Blacklist URL field: https://shallalist.de/Downloads/shallalist.tar.gz. This is our blacklist URL. SquidGuard will download this list and provide us with different categories of domains we can choose to allow or block. It’s available free of charge and is provided by Shalla Secure Services. There are other lists you can use, but many are paid. I’ve been using Shallalist for many years, and it works very well and is updated frequently, so I recommend using it.
3. Click Save at the bottom of the page.
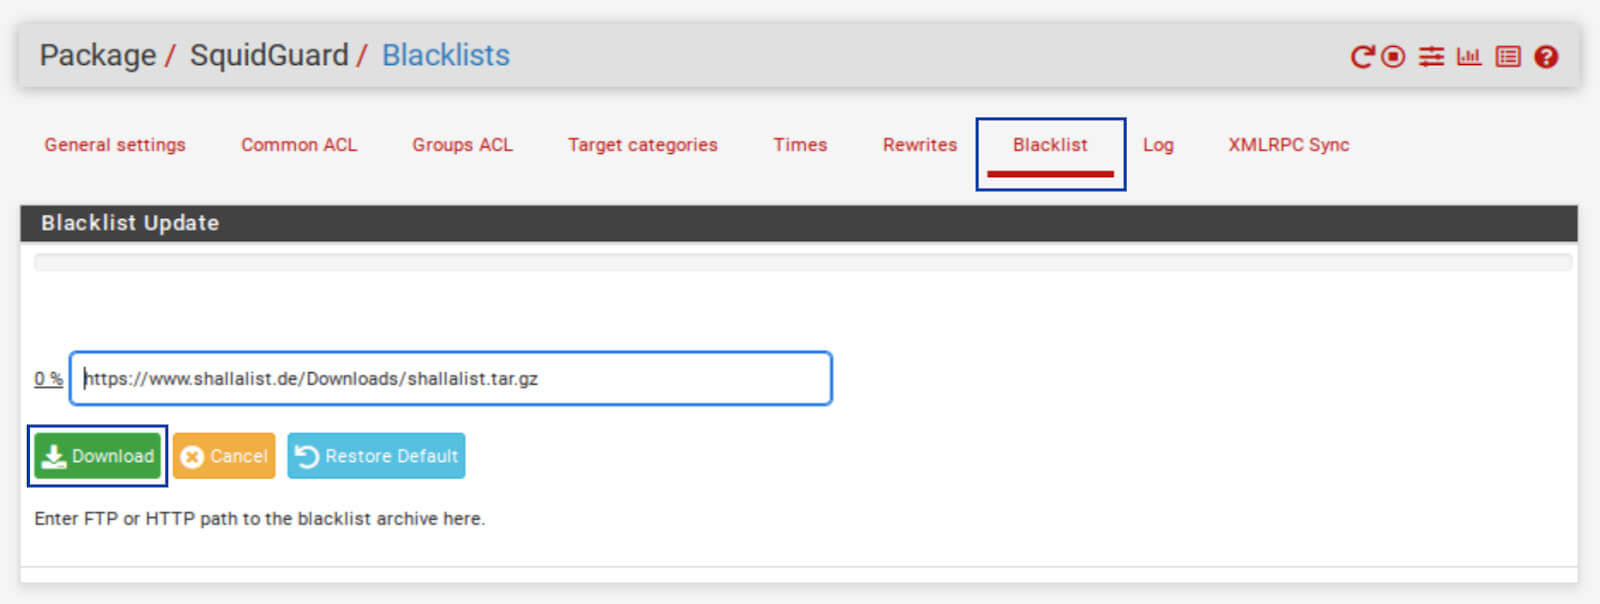
Downloading the Blacklist
1. Go to the Blacklist tab of the SquidGuard Proxy Filter Settings. The blacklist URL is displayed.
2. Click the Download button. The download and parsing of the blacklist begin.
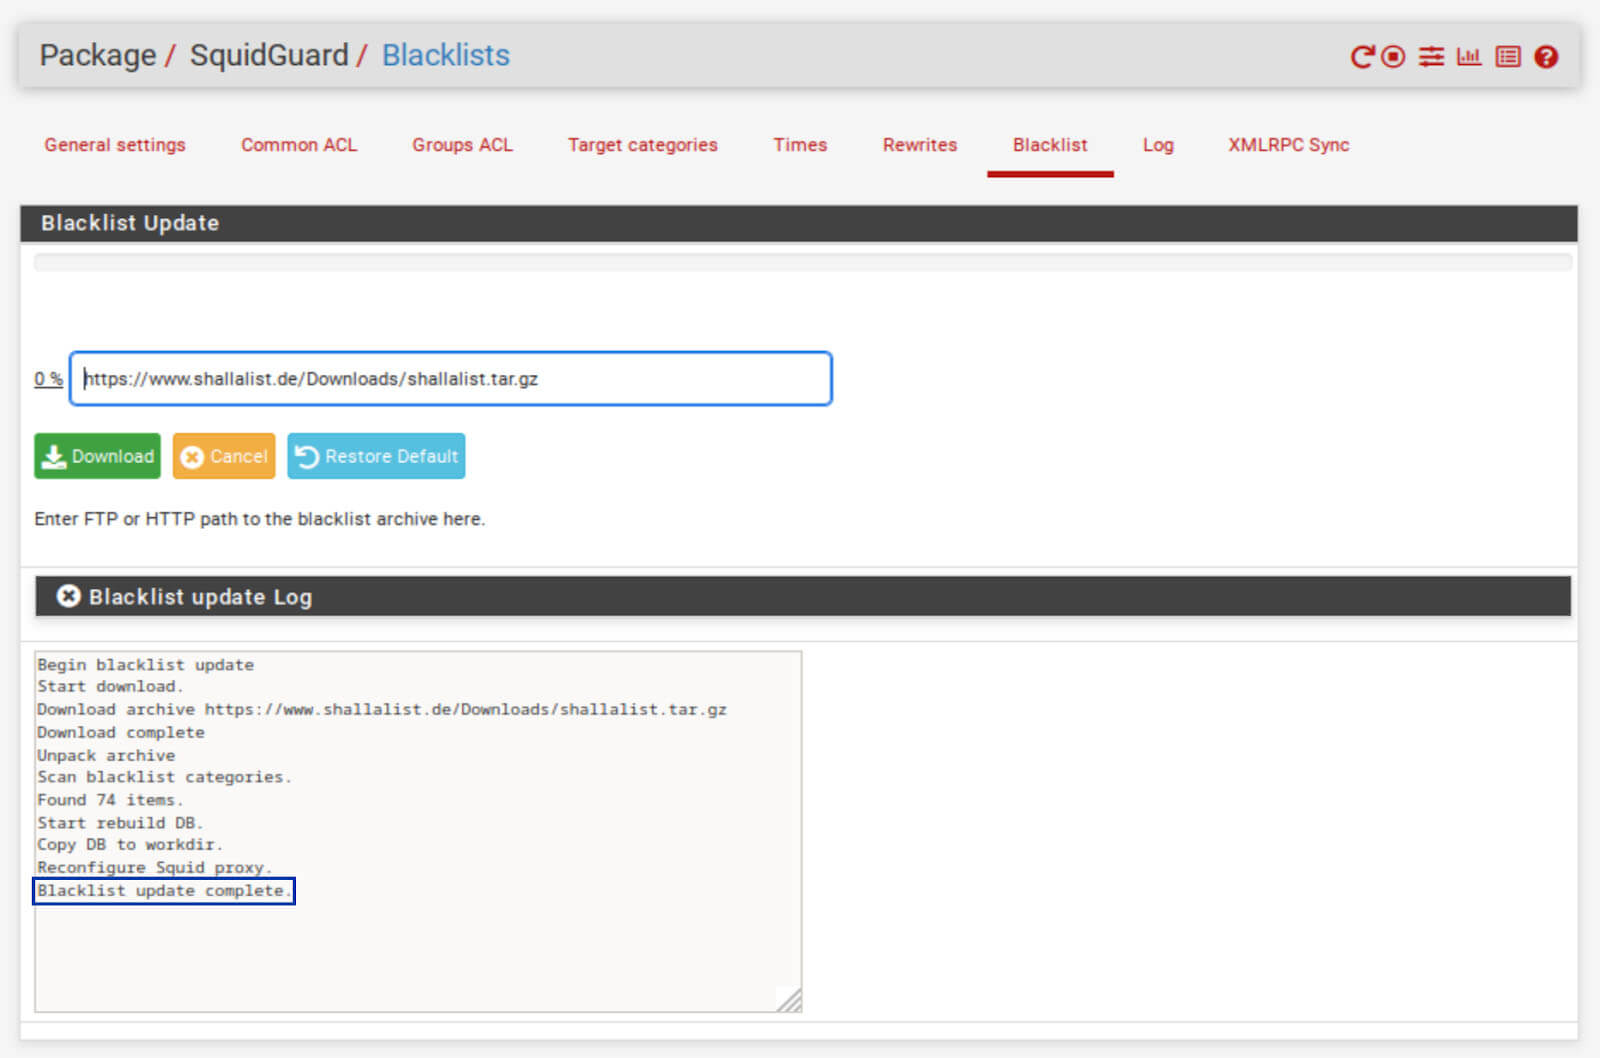
3. Once complete, you should see Blacklist update complete at the bottom of the Blacklist update Log window.
Configuring Blacklist Filtering in SquidGuard
1. Go to the Common ACL tab of the SquidGuard Proxy Filter Settings.
2. Click the + symbol next to Target Rules List. The Target Rules List is displayed.
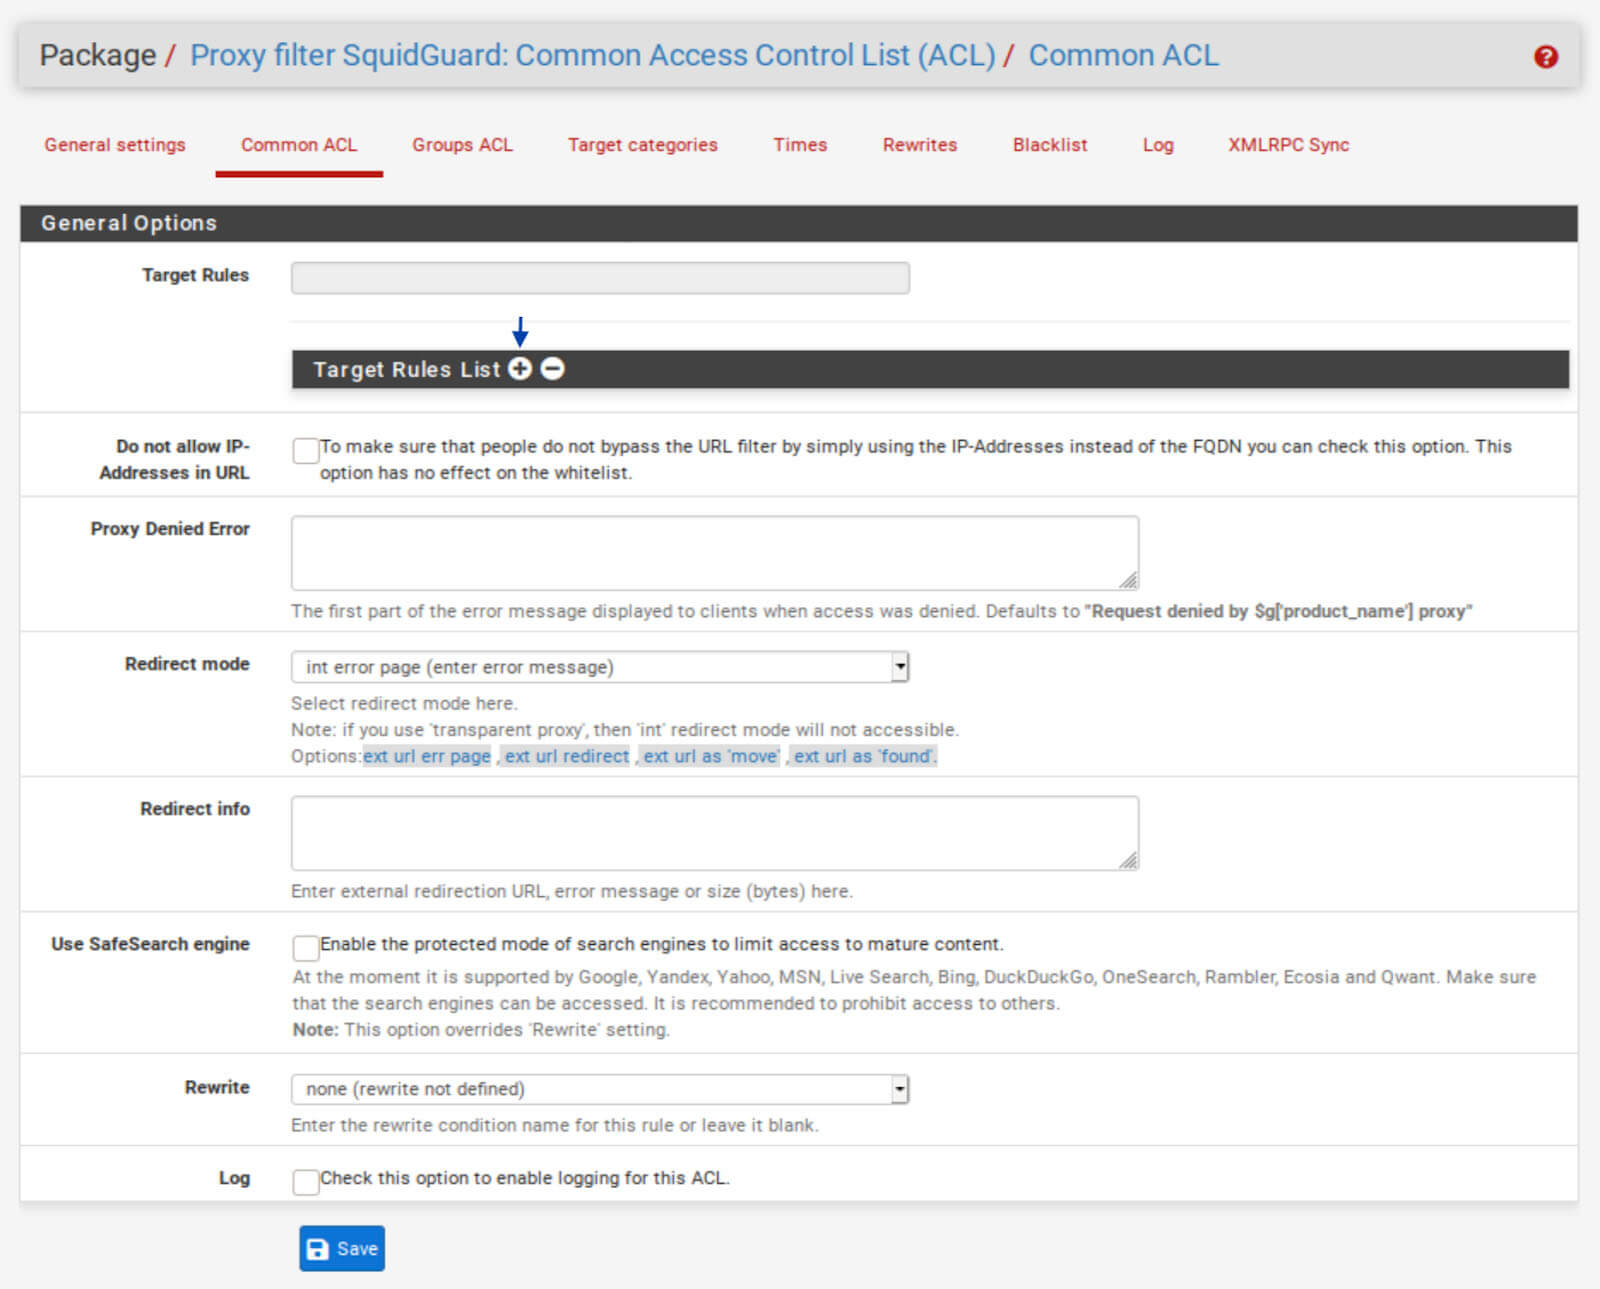
3. The first entry in the list is adv, which stands for advertisements. From the drop-down menu to its right, select Deny.
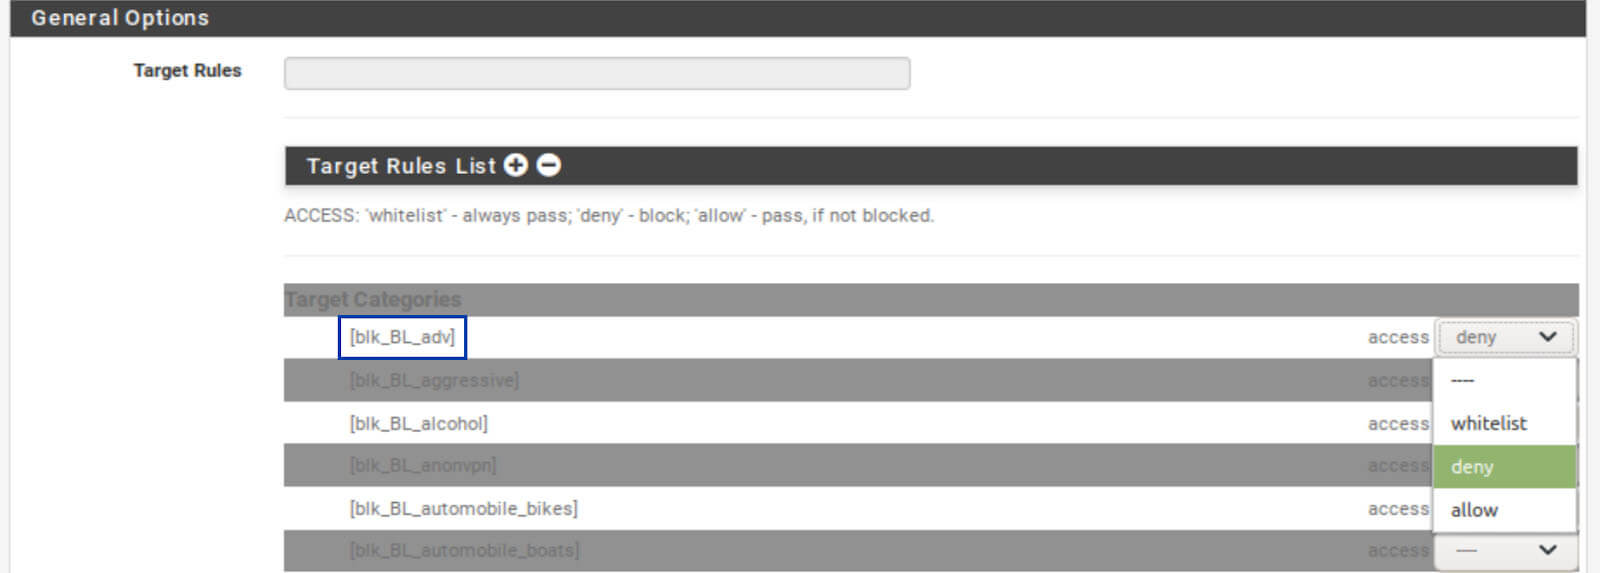
4. Proceed to block any other categories of content you want to block.
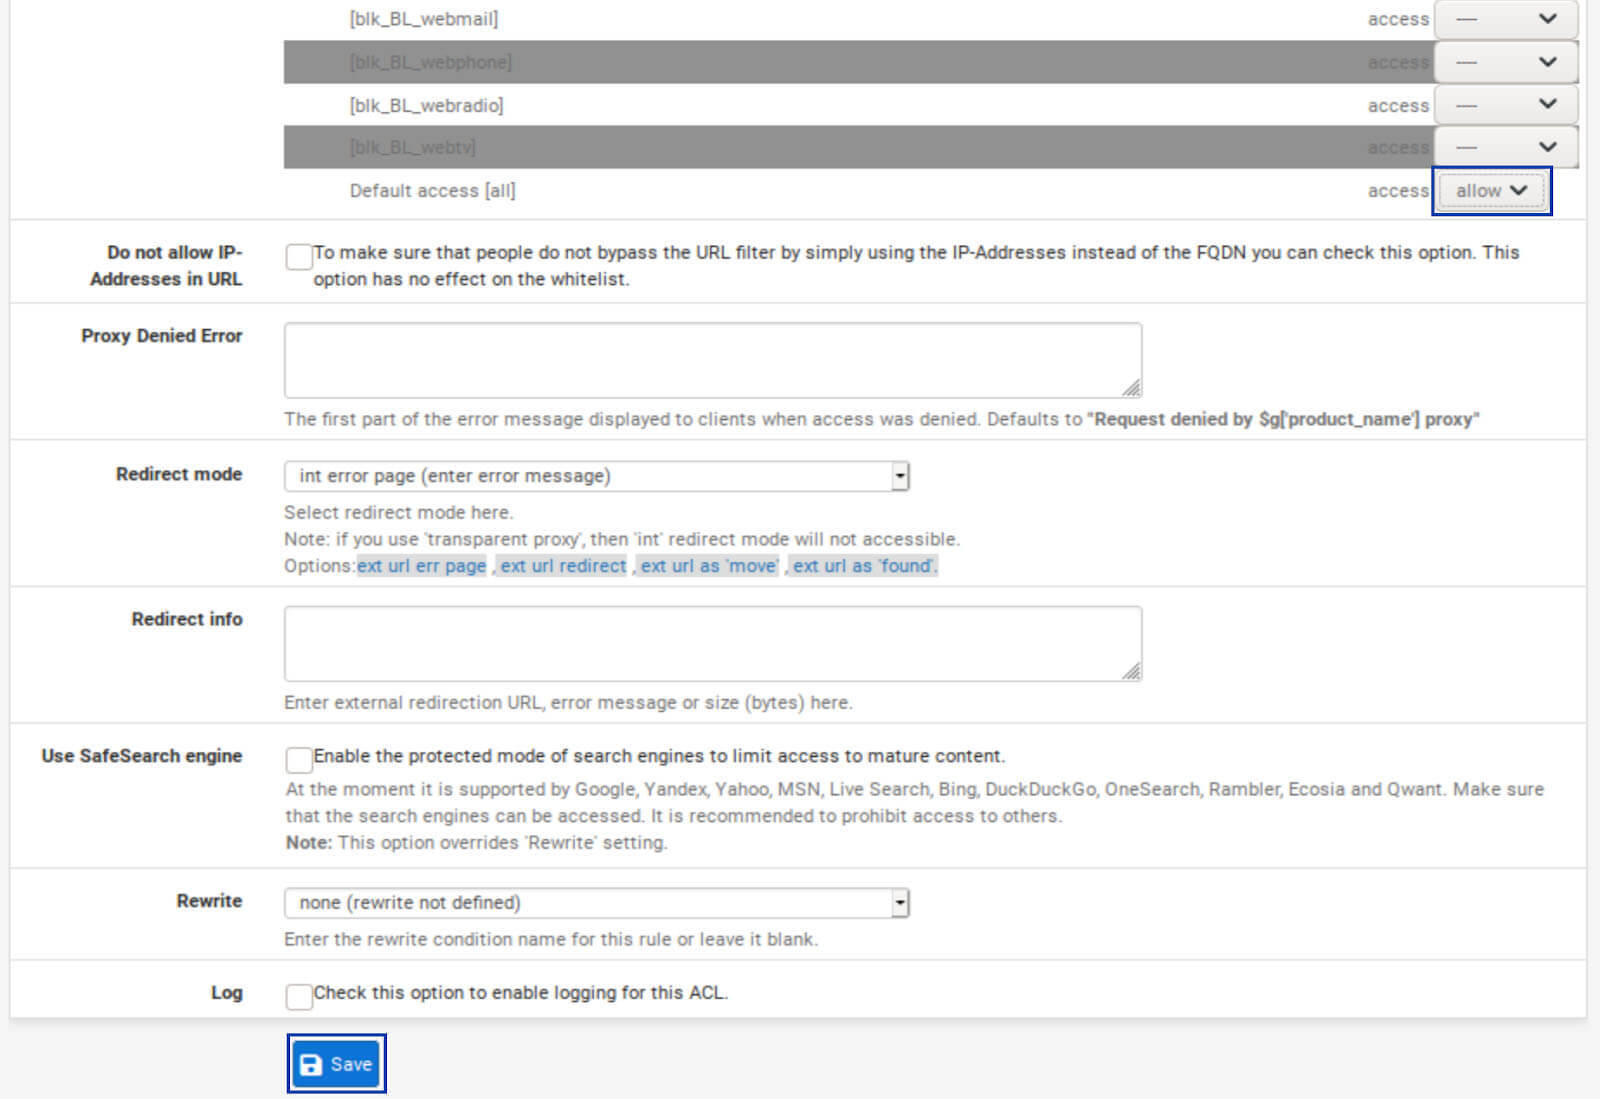
5. Once you’ve denied all of the categories you want to block, go to the bottom of the list, and select Allow from the drop-down menu next to Default Access.
6. Click Save at the bottom of the page.
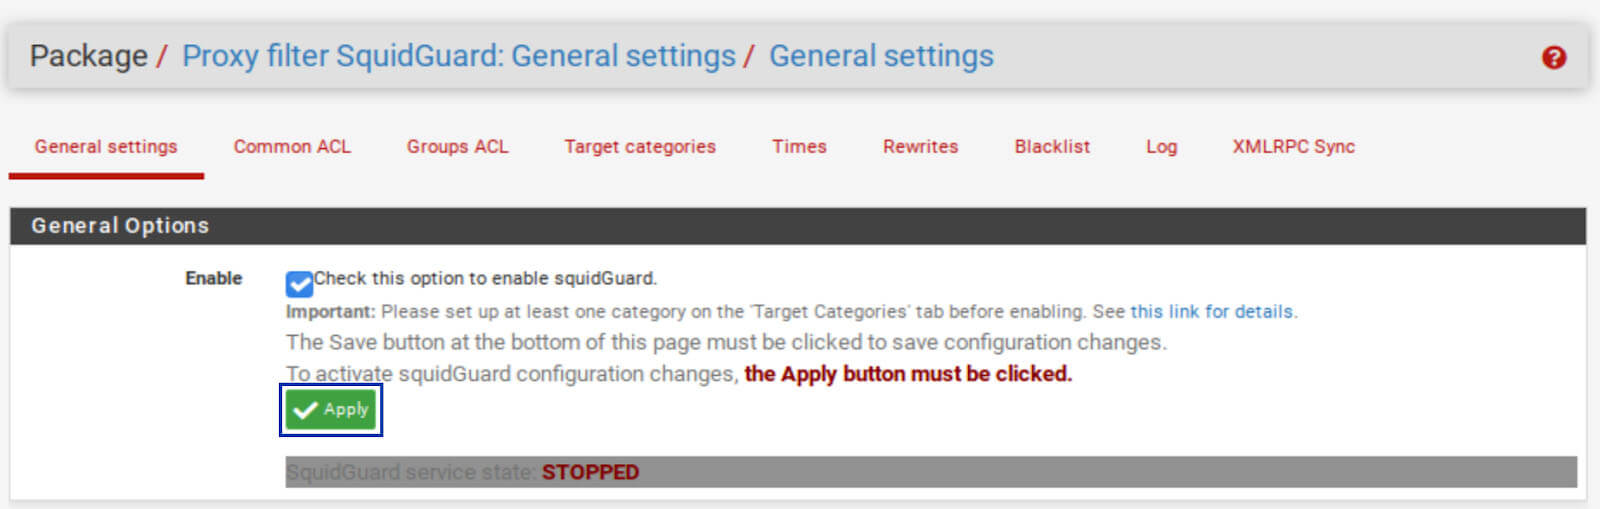
7. Go back to the General tab of the SquidGuard Proxy Filter Settings, tick the Enable box, and click Save at the bottom of the page.
8. Once saved, click the Apply button.
Testing the Setup
We’ve now configured Squid with blacklist filtering. If I use my browser that’s already configured to use the proxy to access a webpage known to display ads, they should be gone.
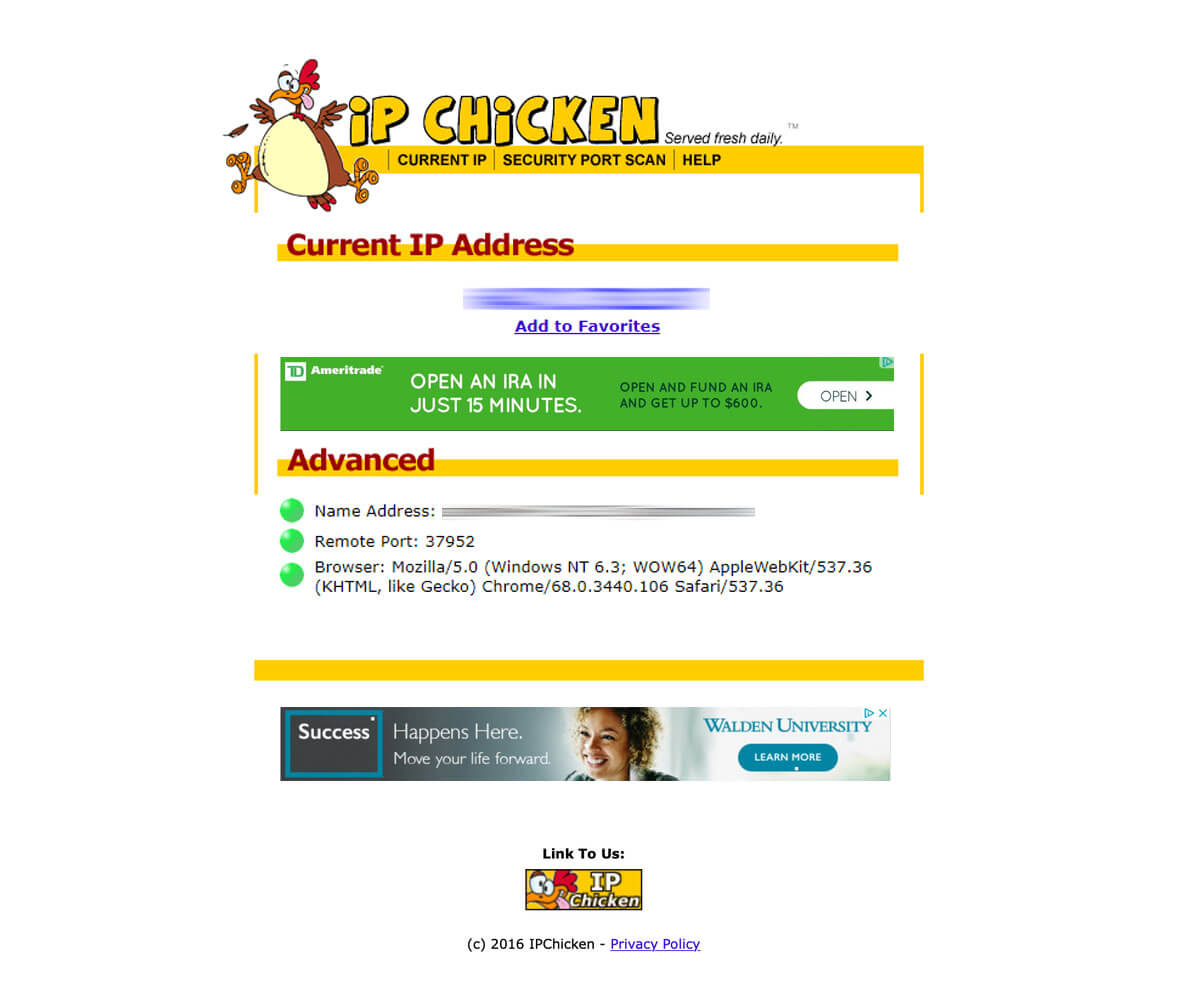
With Squid enabled:
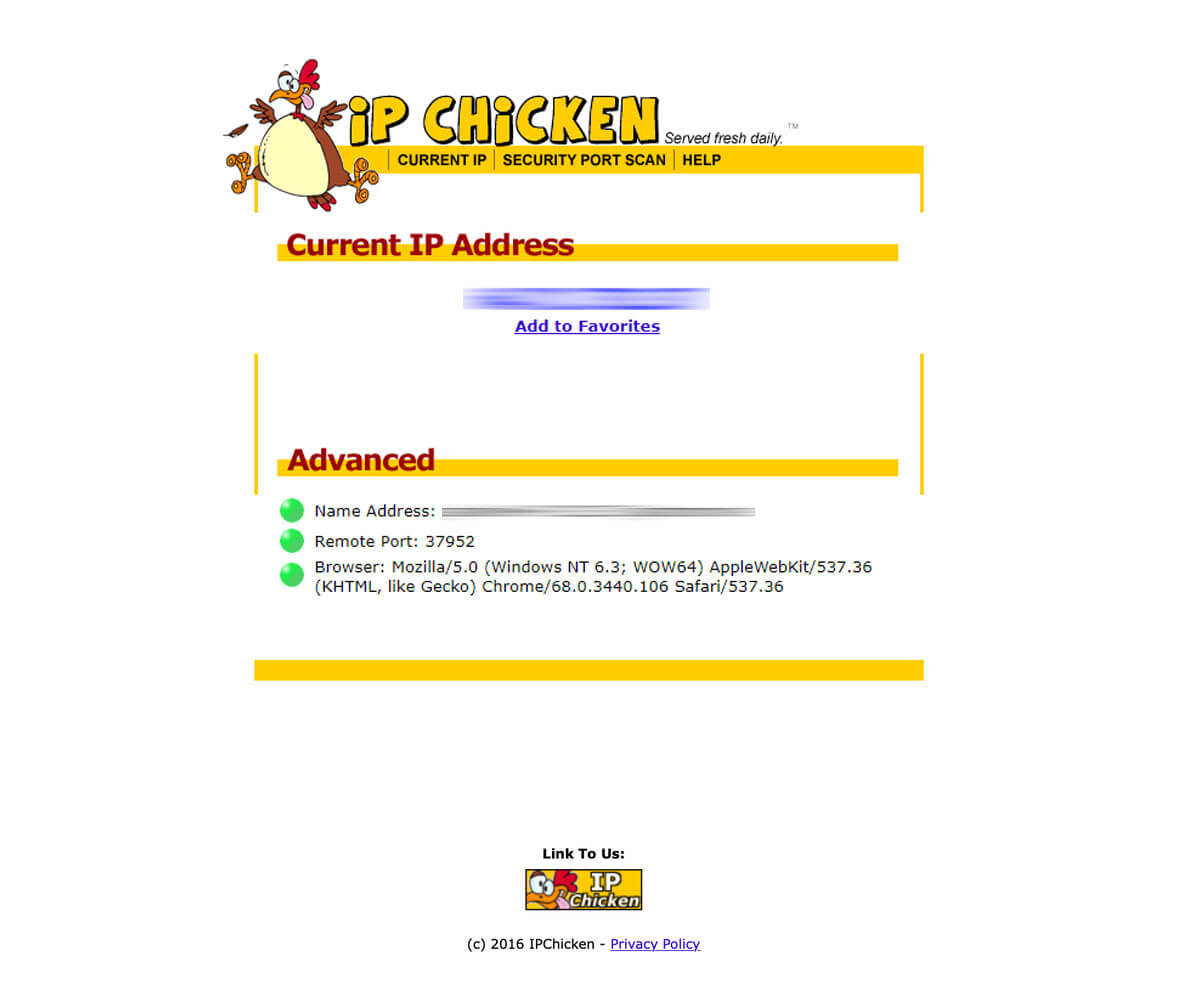
With Squid disabled:
It works. That’s great. But the way I’m set up now, Squid will only intercept by browser’s traffic; hence, I will only benefit from Squid’s ad-blocking in my web browser.
I will show you how to configure your entire device to send all of its traffic through the proxy server. This enables you to benefit from ad-blocking in your apps rather than just your browser. I will show you how to do this on macOS, Windows, Linux, iOS, and Android.
Configuring Content Filtering to be System-Wide on Client Devices
Reset the browser settings
Let’s undo the manual proxy settings we configured in Firefox to test our connection before setting up our client device for a system-wide proxy configuration.
1. Go back to the Network Settings in Firefox and select Use system proxy settings. This instructs the browser to use the system settings as its proxy settings. It’s the default setting.
2. Click OK and close the Settings page.
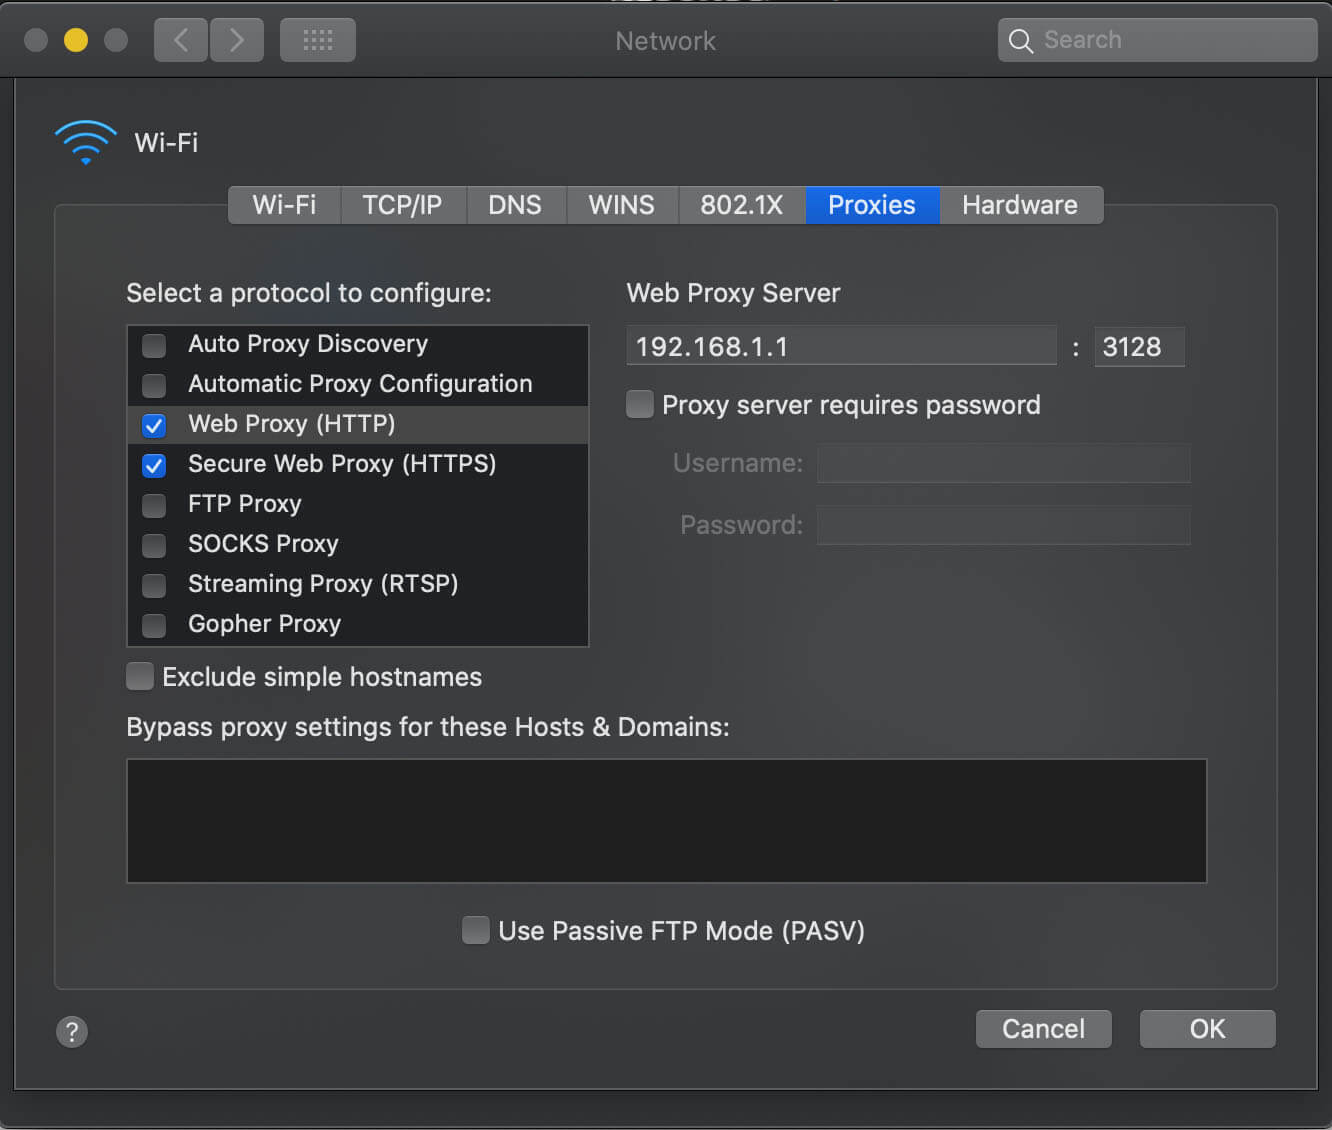
macOS
1. From the System Preferences app, select Network.
2. Make sure your current connection is selected and click Advanced at the bottom right.
3. Select the Proxies tab.
4. Tick both the Web Proxy (HTTP) and the Secure Web Proxy (HTTPS) boxes.
5. Enter your pfSense box IP address and the proxy port—192.168.1.1 and 3128 in my case.
6. Click OK and Apply.
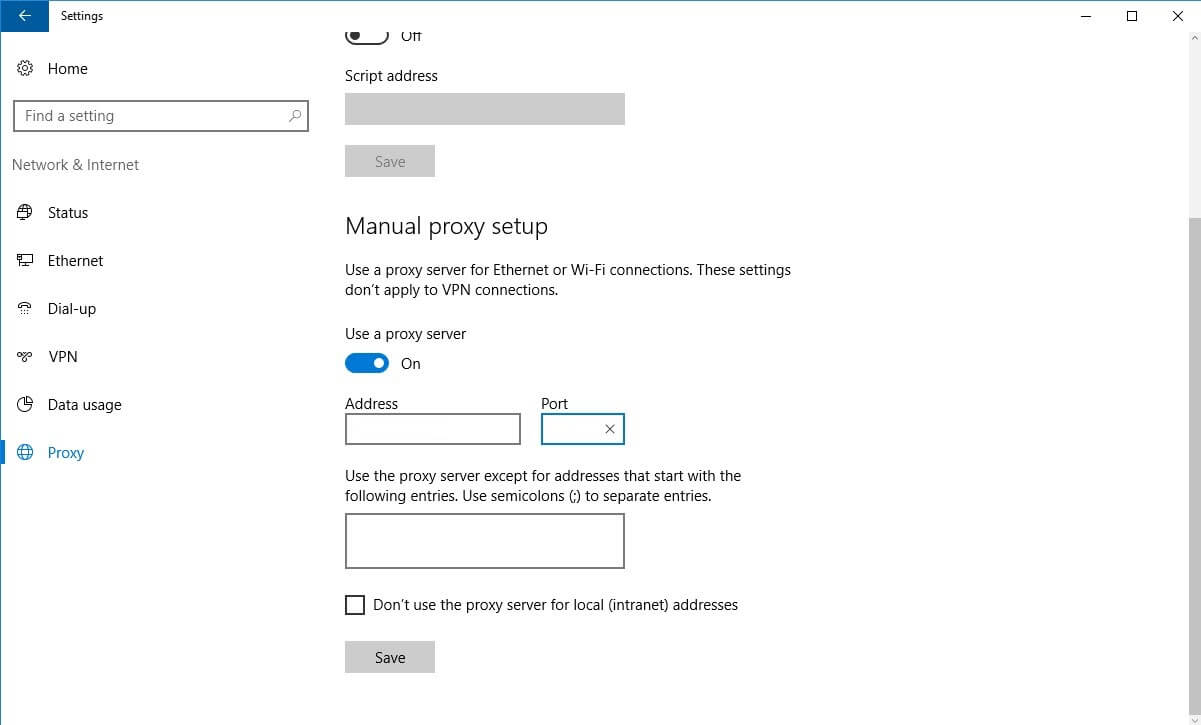
Windows
1. Open the Settings app (Win+I keyboard shortcut).
2. Go to Network and Internet.
3. Select the Proxy tab.
4. Scroll down to the Manual proxy setup section.
5. Enable the Use a proxy server switch.
6. Enter your pfSense box IP address and the proxy port – 192.168.1.1 and 3128 in my case.
7. Click Save.
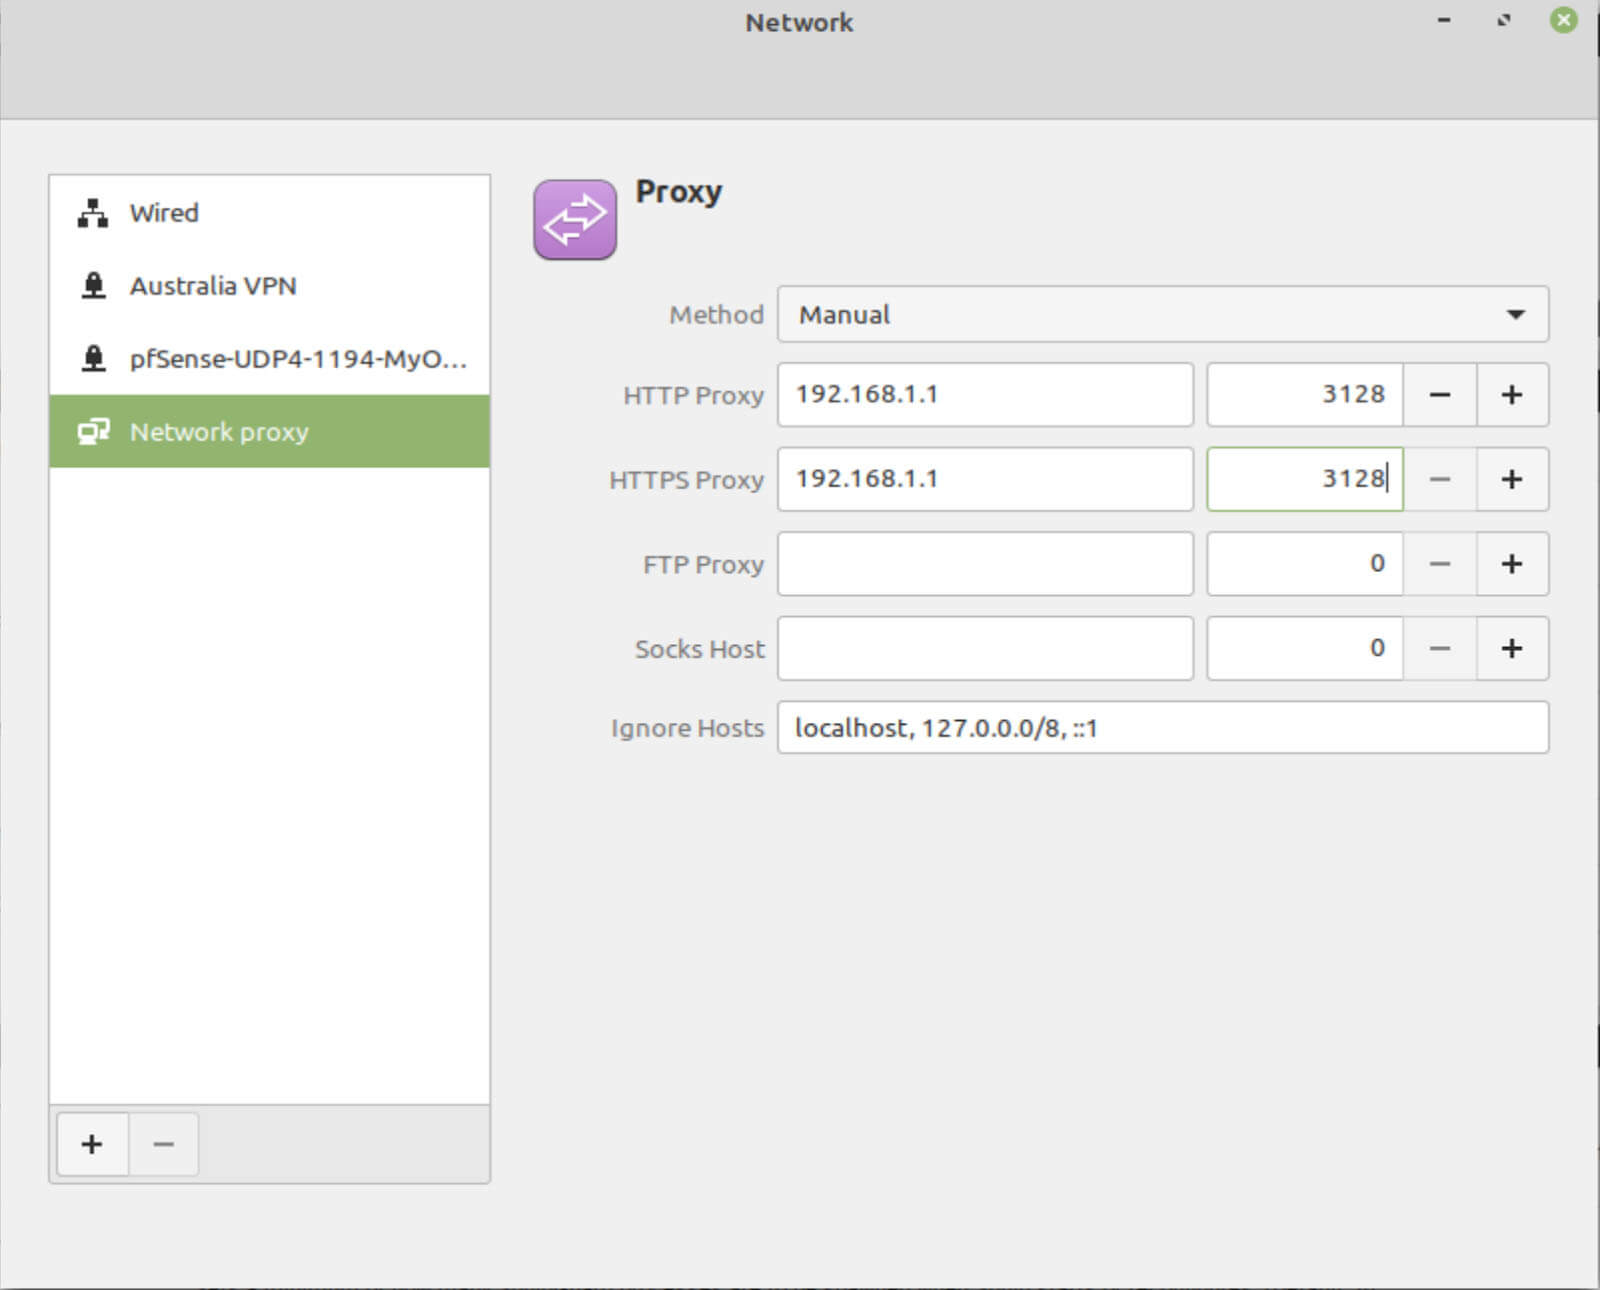
Linux
1. From the Network Settings window, select Network proxy.
2. Select Manual from the Method drop-down menu.
3. Enter your pfSense box IP address and the proxy port – 192.168.1.1 and 3128 in my case – next to HTTP Proxy and HTTPS Proxy.
4. Close the Network Settings window.
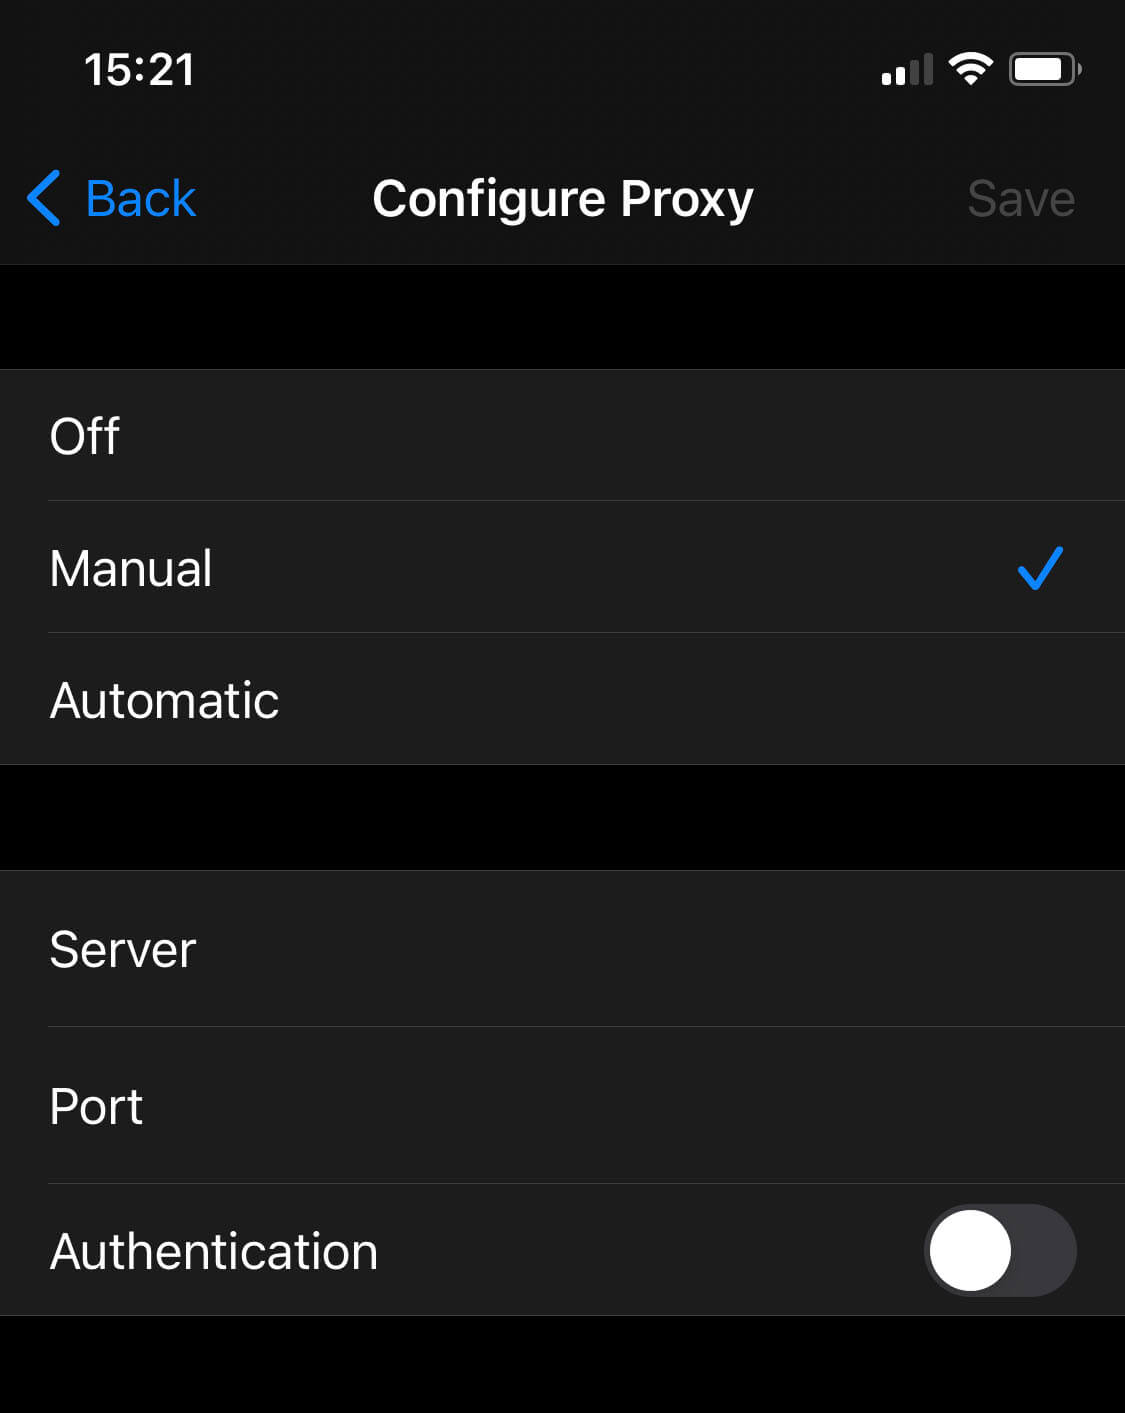
iOS
1. From Settings > WiFi, tap the “i” to the right of your WiFi connection.
2. Scroll down and select Configure Proxy.
3. Select Manual.
4. Enter your pfSense box IP address and the proxy port – 192.168.1.1 and 3128 in my case – next to Server and Port.
5. Close the Settings app.
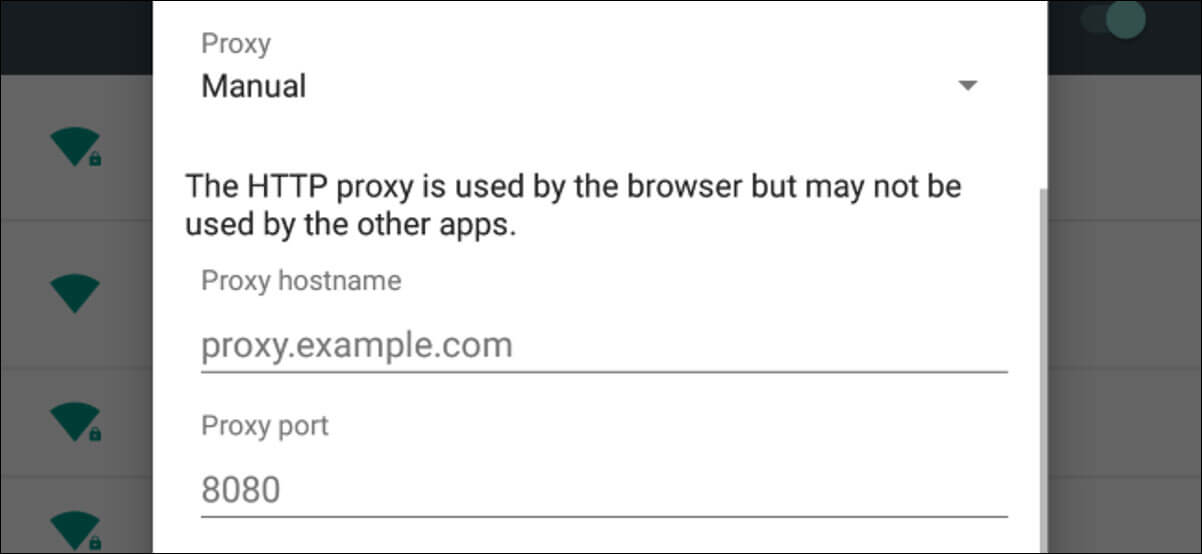
Android
1. From the Settings app, select WiFi.
2. Long-press the currently connected WiFi network.
3. Select Modify network.
4. Expand the Advanced options.
5. Select Manual from the Proxy drop-down menu.
6. Enter your pfSense box IP address and the proxy port – 192.168.1.1 and 3128 in my case – under Proxy hostname and Proxy port.
7. Click Save.
Note that to get the proxy working over mobile data on iOS or Android, you will need to install mobile device management (MDM) profile, which is beyond the scope of this current guide. Perhaps we’ll cover this in the future.
Wrapping Up
So you’ve now got a working proxy server with blacklist filtering that you can use to block ads on all of your devices. You’ve enhanced your security and privacy by removing annoying advertisements that steal your data.
You’ll also consume less bandwidth. And your web pages will load faster since ads won’t need to be downloaded and rendered. But also because Squid is caching content for you. So, content that you frequently request will load more quickly.
Good stuff. Stay safe.
4 Comments
Anonymous
November 4, 2022 5:06 am
Shallalist is no more 🙁
Marc
July 17, 2022 2:40 am
Is there anyway to automate proxy settings, maybe using DHCP?
Also, how would one block internet traffic that didn’t go through the proxy?
Thanks.
AgentXXL
June 24, 2022 8:30 pm
shallalist seems to be down again. While free is fine, I’d be willing to pay for a reliable and trusted blacklist provider. Any suggestions?
Anonymous
March 12, 2022 3:11 am
very good guides Marc… very appreciated, did however have problem downloading the shallalist in the blacklists part of your guide, is there an alternative we use or is this temporary?